
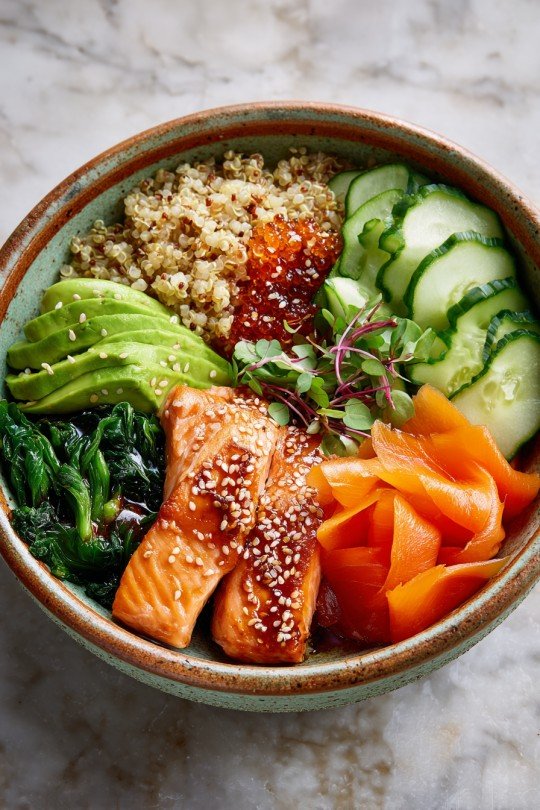
Hey y'all! If you're craving the flavors of sushi but want something simple, hearty, and easier to put together, this Salmon Sushi Grain Bowl is the answer. It's the perfect combination of savory salmon, fluffy rice, vibrant veggies, and classic sushi toppings, ideal for lunch, dinner, or meal prep. It's healthy, satisfying, and packed with delicious textures. Let's get cooking!
Why You'll Love This Salmon Sushi Grain Bowl
- Quick and easy: Ready in just 30 minutes from start to finish.
- Nutritious and balanced: Protein-rich salmon, wholesome grains, and a variety of veggies create a complete meal.
- Customizable: Easily swap ingredients for your favorite sushi flavors or dietary needs.
- Perfect for meal prep: Make ahead for quick, convenient lunches.
- Satisfyingly fresh: Bursting with bright, crisp flavors in every bite.
Salmon Sushi Grain Bowl Ingredients
- 8 oz (225g) skinless salmon fillet (sashimi-grade if raw, or bake/grill cooked)
- 2 cups cooked sushi rice or short-grain brown rice
- 1 cup cucumber, thinly sliced
- 1 medium carrot, julienned
- 1 small avocado, sliced
- ¼ cup edamame, shelled and steamed
- 2 tablespoon pickled ginger
- 2 tablespoon soy sauce
- 1 tablespoon rice vinegar
- 1 teaspoon toasted sesame oil
- 1 teaspoon sesame seeds (white or black)
- 1 sheet nori, sliced into thin strips
- 1 tablespoon sriracha or spicy mayo (optional)
How to Make a Salmon Sushi Grain Bowl
Step 1: Prepare the Rice
Cook 1 cup of sushi rice (or short-grain brown rice) according to package instructions. When done, season with rice vinegar and a pinch of salt for authentic sushi flavor. Allow to cool slightly.
Step 2: Cook or Prepare the Salmon
If using raw, sashimi-grade salmon, slice into bite-sized pieces. If preferred cooked, season the salmon lightly with salt, then bake at 400°F (200°C) for 12-15 minutes, or grill for 8-10 minutes until just cooked through. Let cool slightly, then flake or slice.
Step 3: Prep the Veggies and Toppings
Thinly slice the cucumber, julienne the carrot, and slice the avocado. Steam edamame according to package directions. Slice the nori and gather your pickled ginger and sesame seeds.
Step 4: Assemble the Salmon Sushi Grain Bowl
Divide the rice between two bowls. Arrange the salmon, cucumber, carrot, avocado, edamame, and pickled ginger over the rice in colorful sections.
Drizzle soy sauce, toasted sesame oil, and sriracha or spicy mayo (if using) over the top. Finish with sesame seeds and a sprinkle of nori strips.
Salmon Sushi Grain Bowl Notes
- For a detailed guide on using sashimi-grade fish safely, check out this resource.
- Short on time? Use store-bought cooked salmon or canned salmon for a quick protein swap.
- To make your sushi rice extra flavorful, find tips at Just One Cookbook.
Salmon Sushi Grain Bowl Variations
- Spicy Tuna Grain Bowl: Substitute salmon with diced tuna mixed with sriracha and mayo.
- Vegetarian Sushi Grain Bowl: Replace salmon with marinated tofu or extra edamame for a plant-based option.
- Poke-Inspired Bowl: Use marinated salmon chunks with diced mango and radishes for a Hawaiian twist.
Required Equipment for Salmon Sushi Grain Bowl
- Cutting board and sharp knife
- Small saucepan or rice cooker
- Baking sheet (if cooking salmon)
- Medium mixing bowls
- Serving bowls
Storage for Salmon Sushi Grain Bowl
Store any leftover components separately in airtight containers in the refrigerator. Cooked salmon and rice are best consumed within 2 days. For raw fish versions, enjoy immediately and do not store leftovers. Prepared veggies stay fresh for up to 3 days.
Serving Recommendations & Pairings for Salmon Sushi Grain Bowl
- Pair with miso soup or a simple seaweed salad for a classic sushi restaurant feel.
- Serve with a light green tea or crisp sake.
- Top with extra nori, wasabi, or pickled daikon for added zing.
Salmon Sushi Grain Bowl Pro Tips
- Use a very sharp knife for slicing fish and veggies to achieve professional-looking cuts.
- Mix a teaspoon of sugar into your rice vinegar before seasoning the rice for a subtle sweetness.
- Brush salmon with a light soy sauce glaze before baking for extra umami flavor. For more on sushi rice perfection, see Bon Appétit's guide.
Salmon Sushi Grain Bowl FAQ
- Can I use frozen salmon? Yes, just make sure it's thawed thoroughly and pat dry before preparing or cooking. For raw versions, confirm it's labeled as sashimi-grade.
- How can I make this gluten-free? Use tamari or coconut aminos in place of soy sauce and double-check other packaged ingredients for gluten.
- Can I make this ahead for meal prep? Absolutely! Prepare each ingredient separately and assemble just before eating for the freshest texture.
Prep time: 15 minutes | Cook time: 15 minutes | Total time: 30 minutes | Serves: 2
Ingredients
- 2 cups cooked sushi rice
- 2 salmon fillets (about 6 oz each)
- 1 tablespoon soy sauce
- 1 tablespoon rice vinegar
- 1 teaspoon sesame oil
- 1 cup diced cucumber
- 1 medium avocado, sliced
- 1 sheet nori, cut into strips
- 2 tablespoons pickled ginger
- 1 tablespoon toasted sesame seeds
Instructions
-
1Preheat oven to 400°F (200°C). Place salmon fillets on a lined baking sheet, brush with soy sauce and sesame oil, and bake for 12-15 minutes until just cooked through.
-
2While the salmon bakes, mix cooked sushi rice with rice vinegar and let it cool slightly.
-
3Divide the sushi rice among 4 bowls. Top with flaked baked salmon, diced cucumber, avocado slices, nori strips, pickled ginger, and toasted sesame seeds.
-
4Serve immediately, optionally with extra soy sauce or your favorite bowl toppings.
Approximate Information for One Serving
Nutrition Disclaimers
Number of total servings shown is approximate. Actual number of servings will depend on your preferred portion sizes.
Nutritional values shown are general guidelines and reflect information for 1 serving using the ingredients listed, not including any optional ingredients. Actual macros may vary slightly depending on specific brands and types of ingredients used.
To determine the weight of one serving, prepare the recipe as instructed. Weigh the finished recipe, then divide the weight of the finished recipe (not including the weight of the container the food is in) by the desired number of servings. Result will be the weight of one serving.
Did you make this recipe?
Please consider Pinning it!!


Leave a Reply