
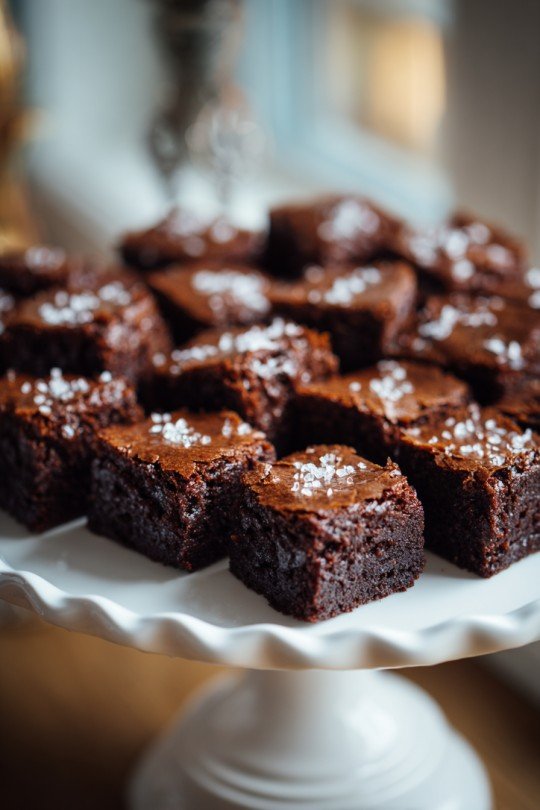
Hey y'all! If you're in the mood for an irresistibly chocolatey treat that's perfect for sharing, these Mini Brownie Bites are about to become your new go-to. With a fudgy center, crackly tops, and the cutest bite-sized shape, these little delights are crowd-pleasers at parties, bake sales, or just when you want to treat yourself. Ready for some sweet baking fun? Let's get cooking!
Why You'll Love This
- Simple, pantry-friendly ingredients make these quick and easy to whip up anytime.
- Perfectly portioned for snacking, lunchboxes, or parties.
- Fudgy, rich chocolate flavor in every bite-sized morsel.
- Customize with your favorite add-ins for endless flavor combos.
- Stay soft and fresh for days, so they're ideal for make-ahead treats.
Ingredients
- ½ cup (115g) unsalted butter, melted
- 1 cup (200g) granulated sugar
- 2 large eggs, room temperature
- 1 teaspoon pure vanilla extract
- ⅓ cup (40g) unsweetened cocoa powder
- ½ cup (63g) all-purpose flour
- ¼ teaspoon salt
- ¼ teaspoon baking powder
- ½ cup (90g) semi-sweet chocolate chips (plus extra for topping, optional)
Directions
Step 1: Prep the Oven and Pan
Preheat your oven to 350°F (177°C). Lightly grease a 24-cup mini muffin pan or line with mini paper liners for easier removal.
Step 2: Mix Wet Ingredients
In a medium mixing bowl, whisk together melted butter and sugar until smooth and glossy. Add in eggs and vanilla extract, whisking until fully combined.
Step 3: Combine Dry Ingredients
In a separate small bowl, sift together the cocoa powder, flour, salt, and baking powder.
Step 4: Make the Brownie Batter
Gradually fold the dry ingredients into the wet ingredients using a spatula, mixing just until no streaks remain. Do not overmix. Gently stir in the chocolate chips.
Step 5: Fill and Bake
Spoon brownie batter evenly into the mini muffin cups, filling each about ¾ full. If desired, press a few extra chocolate chips onto the tops.
Bake for 12-15 minutes, or until a toothpick inserted in the center comes out with a few moist crumbs. (Avoid overbaking for fudgy centers!)
Step 6: Cool and Serve
Let brownies cool in the pan for 10 minutes, then transfer to a wire rack to cool completely. Enjoy your decadent mini brownie bites!
Notes
- For easy removal, use mini muffin liners or let brownies cool fully before loosening with a small offset spatula.
- If you like gooey centers, aim closer to the minimum baking time.
- Allow brownies to cool in the pan for at least 10 minutes to help them firm up and keep their shape.
Variations
- Peanut Butter Swirl: Drop a ¼ teaspoon of peanut butter on top before baking and swirl with a toothpick.
- Mint Chocolate: Add ½ teaspoon peppermint extract to the batter and top with crushed mint candies.
- Nutty Brownie Bites: Fold in ⅓ cup chopped walnuts or pecans for extra crunch.
Required Equipment
- Mini muffin pan (24-cup capacity)
- Mixing bowls (1 medium, 1 small)
- Whisk and spatula
- Measuring cups and spoons
- Wire cooling rack
Storage Instructions
Store mini brownie bites in an airtight container at room temperature for up to 4 days. For longer storage, refrigerate for up to 1 week or freeze for up to 2 months. Thaw at room temperature before serving.
Suggested Pairings & Serving Recommendations
- Serve alongside a cold glass of milk or hot coffee for an extra-indulgent treat.
- Top with a scoop of vanilla ice cream for a decadent mini dessert.
- Arrange on a platter with fresh berries for a beautiful party display.
Pro Tips
- Chill brownie bites in the fridge before serving for an ultra-fudgy texture.
- Sift cocoa powder for a lump-free, ultra-smooth batter.
- Don’t overbake – mini brownies can dry out quickly; moist crumbs on the tester mean they're done!
FAQ
- Can I use a regular muffin tin?
Yes, but increase the baking time to about 18-22 minutes and fill each well only halfway. - How do I make these gluten-free?
Substitute the all-purpose flour for your favorite 1:1 gluten-free baking blend. - Can I freeze these mini brownie bites?
Absolutely! Place cooled bites in a freezer bag, label, and freeze for up to 2 months.
Prep time: 10 minutes
Total time: 25 minutes (including baking and cooling)
Ingredients
- ½ cup (115g) unsalted butter, melted
- ¾ cup (150g) granulated sugar
- ¼ cup (50g) brown sugar
- 2 large eggs
- 1 teaspoon vanilla extract
- ½ cup (60g) all-purpose flour
- ⅓ cup (35g) unsweetened cocoa powder
- ¼ teaspoon salt
- ½ cup (90g) mini chocolate chips
Instructions
-
1Preheat your oven to 350°F (175°C). Grease a 24-cup mini muffin pan or line with mini paper liners.
-
2In a medium bowl, whisk together the melted butter, granulated sugar, and brown sugar until smooth.
-
3Add the eggs and vanilla extract, whisking until well combined.
-
4Sift in the flour, cocoa powder, and salt. Fold the dry ingredients into the wet mixture just until combined. Stir in the mini chocolate chips.
-
5Divide the batter evenly among the mini muffin cups, filling each about ¾ full.
-
6Bake for 10–12 minutes or until the tops look set and a toothpick inserted comes out with a few moist crumbs. Cool in the pan for 10 minutes before transferring to a wire rack.
Approximate Information for One Serving
Nutrition Disclaimers
Number of total servings shown is approximate. Actual number of servings will depend on your preferred portion sizes.
Nutritional values shown are general guidelines and reflect information for 1 serving using the ingredients listed, not including any optional ingredients. Actual macros may vary slightly depending on specific brands and types of ingredients used.
To determine the weight of one serving, prepare the recipe as instructed. Weigh the finished recipe, then divide the weight of the finished recipe (not including the weight of the container the food is in) by the desired number of servings. Result will be the weight of one serving.
Did you make this recipe?
Please consider Pinning it!!

Leave a Reply