
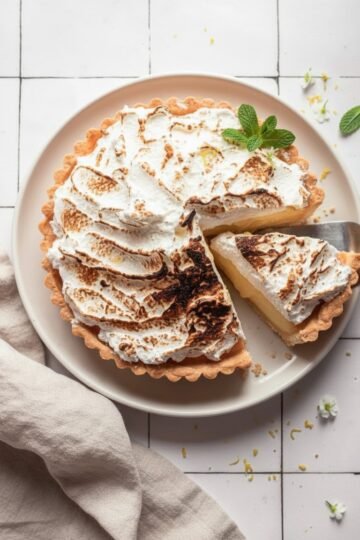
Hey y'all! If you're hunting for a show-stopping summer dessert that blends luscious peaches, a cloud-like creamy filling, and a buttery crisp crust, this Creamy Peach Chiffon Pie is about to become your new favorite. It's the perfect centerpiece for picnics, family dinners, or just a sweet slice of summer any day of the week. Let's get cooking!

Why You'll Love This Creamy Peach Chiffon Pie
- Light, airy, and creamy texture that's impossible to resist.
- Simple, no-bake preparation—just chill and serve!
- Packed with juicy, ripe peach flavor in every bite.
- Perfectly sweet and refreshing for hot weather gatherings.
- Can be made ahead—great for entertaining or potlucks.
Ingredients
- 1 ¼ cups graham cracker crumbs
- ¼ cup granulated sugar (for crust)
- ⅓ cup unsalted butter, melted
- 1 envelope (2 ½ tsp) unflavored gelatin
- ¼ cup cold water
- ½ cup granulated sugar (for filling)
- 3 large ripe peaches, peeled and diced (about 2 cups)
- 2 large egg yolks
- 2 tablespoon fresh lemon juice
- 1 teaspoon pure vanilla extract
- 1 cup heavy whipping cream, chilled
- ¼ cup powdered sugar
- Fresh peach slices and whipped cream for garnish (optional)
Directions
Step 1: Prepare the Graham Cracker Crust
- In a medium bowl, mix together 1 ¼ cups graham cracker crumbs and ¼ cup granulated sugar.
- Stir in ⅓ cup melted butter until the mixture is evenly moistened.
- Press the crumb mixture firmly into the bottom and up the sides of a 9-inch pie dish.
- Chill the crust in the refrigerator while you prepare the filling.
Step 2: Make the Peach Chiffon Filling
- In a small saucepan, sprinkle 1 envelope unflavored gelatin over ¼ cup cold water. Let stand for 5 minutes to soften.
- Add ½ cup granulated sugar, diced peaches, 2 large egg yolks, and 2 tablespoons lemon juice to the gelatin mixture. Cook over medium heat, stirring constantly, until the peaches are softened and the mixture just starts to bubble, about 5-6 minutes.
- Remove from heat and cool to room temperature, about 20-30 minutes. Stir in 1 teaspoon vanilla extract.
Step 3: Whip the Cream
- In a cold mixing bowl, beat 1 cup heavy cream and ¼ cup powdered sugar until stiff peaks form.
Step 4: Combine and Assemble
- Gently fold the cooled peach mixture into the whipped cream until no streaks remain.
- Spoon the creamy filling into the prepared crust and smooth the top.
- Refrigerate for at least 4 hours, or until set.
Step 5: Garnish and Serve
- Before serving, top with additional whipped cream and fresh peach slices if desired. Slice and enjoy!
Notes
- Be sure the peach mixture is fully cooled before folding into the whipped cream to prevent melting.
- Use fully ripe peaches for the sweetest flavor and best texture.
- Pie can be made a day ahead—just cover tightly with plastic wrap.
Variations
- Swap peaches for nectarines or mangoes for a fun twist.
- Try a gingersnap or vanilla wafer crust instead of graham crackers.
- Stir ½ cup raspberries into the filling for a peach-berry vibe.
Required Equipment
- 9-inch pie dish
- Medium mixing bowls
- Electric mixer or stand mixer
- Spatula
- Small saucepan
- Measuring cups and spoons
Storage Instructions
Store any leftover peach chiffon pie covered in the refrigerator for up to 3 days. For best texture, keep the pie chilled until just before serving.
Suggested Pairings & Serving Recommendations
- Serve with a scoop of creamy vanilla ice cream on the side.
- Pair with iced tea, lemonade, or a sparkling peach cocktail for a true summer treat.
- Garnish each slice with a sprig of fresh mint for a pretty, fragrant finishing touch.
Pro Tips
- Chill your mixing bowl and beaters before whipping the cream for maximum volume.
- Press the crust firmly—use the bottom of a glass for an even base.
- If your peaches aren't sweet enough, add an extra tablespoon of sugar to the filling.
FAQ
- Can I use frozen peaches?
- Yes! Thaw and drain frozen peaches well before dicing and using in this recipe.
- Is peach chiffon pie safe to eat with raw eggs?
- The egg yolks are gently cooked in the filling, but if you're concerned, use pasteurized eggs.
- Can I make this pie gluten-free?
- Yes—simply swap in gluten-free graham crackers for the crust.
Prep time: 30 minutes
Total time: 4 hours 30 minutes (includes chilling)
Ingredients
- 1 ¼ cups graham cracker crumbs
- ¼ cup granulated sugar (for crust)
- ⅓ cup unsalted butter, melted
- 1 envelope (2 ½ tsp) unflavored gelatin
- ¼ cup cold water
- ½ cup granulated sugar (for filling)
- 3 large ripe peaches, peeled and diced (about 2 cups)
- 2 large egg yolks
- 2 tablespoon fresh lemon juice
- 1 teaspoon pure vanilla extract
- 1 cup heavy whipping cream, chilled
- ¼ cup powdered sugar
- Fresh peach slices and whipped cream for garnish (optional)
Instructions
-
1In a medium bowl, mix together 1 ¼ cups graham cracker crumbs and ¼ cup granulated sugar.
-
2Stir in ⅓ cup melted butter until the mixture is evenly moistened.
-
3Press the crumb mixture firmly into the bottom and up the sides of a 9-inch pie dish.
-
4Chill the crust in the refrigerator while you prepare the filling.
-
5In a small saucepan, sprinkle 1 envelope unflavored gelatin over ¼ cup cold water. Let stand for 5 minutes to soften.
-
6Add ½ cup granulated sugar, diced peaches, 2 large egg yolks, and 2 tablespoons lemon juice to the gelatin mixture. Cook over medium heat, stirring constantly, until the peaches are softened and the mixture just starts to bubble, about 5-6 minutes.
-
7Remove from heat and cool to room temperature, about 20-30 minutes. Stir in 1 teaspoon vanilla extract.
-
8In a cold mixing bowl, beat 1 cup heavy cream and ¼ cup powdered sugar until stiff peaks form.
-
9Gently fold the cooled peach mixture into the whipped cream until no streaks remain.
-
10Spoon the creamy filling into the prepared crust and smooth the top.
-
11Refrigerate for at least 4 hours, or until set.
-
12Before serving, top with additional whipped cream and fresh peach slices if desired. Slice and enjoy!
Approximate Information for One Serving
Nutrition Disclaimers
Number of total servings shown is approximate. Actual number of servings will depend on your preferred portion sizes.
Nutritional values shown are general guidelines and reflect information for 1 serving using the ingredients listed, not including any optional ingredients. Actual macros may vary slightly depending on specific brands and types of ingredients used.
To determine the weight of one serving, prepare the recipe as instructed. Weigh the finished recipe, then divide the weight of the finished recipe (not including the weight of the container the food is in) by the desired number of servings. Result will be the weight of one serving.
Did you make this recipe?
Please consider Pinning it!

Leave a Reply