
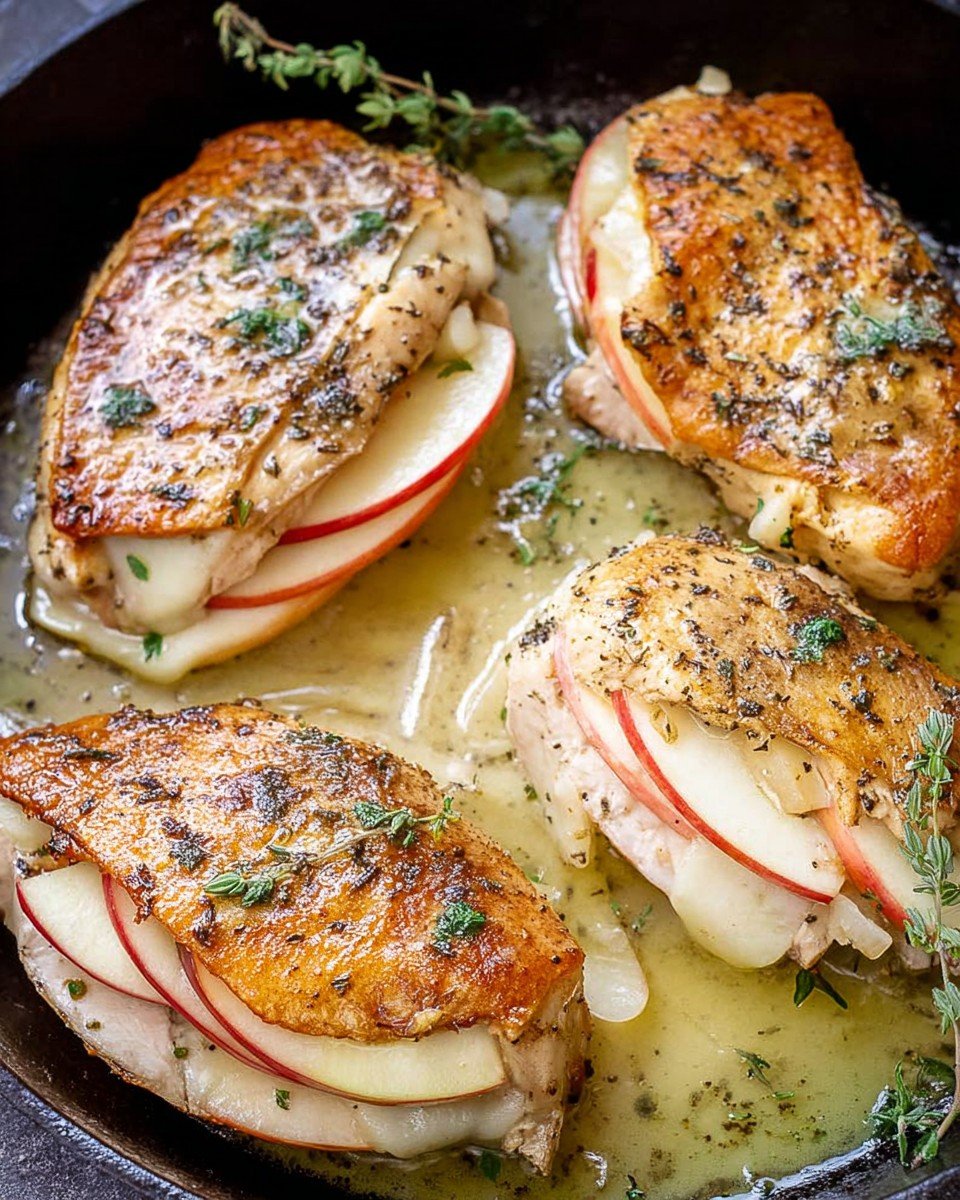
Hey y'all! Craving something new for dinner that feels fancy but couldn’t be easier? Let me introduce you to my Apple and Brie Stuffed Chicken recipe! Tender chicken breasts are packed with sweet apples, melty brie, and fresh herbs, then baked to juicy perfection. This dish is a total crowd-pleaser—it's elegant enough for guests, yet easy enough for a weeknight treat. Let’s get cooking!
Why You'll Love This
- Combines sweet apples and creamy brie for a gourmet flavor in every bite.
- Super simple to prep but looks restaurant-worthy on the plate.
- Makes weeknight dinners or special occasions a breeze.
- Pairs easily with a variety of sides for a customizable meal.
- Healthy, high-protein, and naturally gluten-free!
Ingredients
- 4 boneless, skinless chicken breasts
- 1 tablespoon olive oil
- 1 medium Honeycrisp or Gala apple, cored and thinly sliced
- 4 ounces brie cheese, sliced
- 2 teaspoons fresh thyme leaves (or ½ teaspoon dried thyme)
- ½ teaspoon garlic powder
- ½ teaspoon salt
- ¼ teaspoon black pepper
- Toothpicks or kitchen twine, for securing
Directions
Step 1: Preheat the Oven
Preheat your oven to 400°F (200°C). Lightly grease a baking dish with a bit of olive oil or nonstick spray.
Step 2: Prepare the Chicken
Pat the chicken breasts dry with paper towels. Using a sharp knife, carefully create a pocket in each chicken breast by slicing horizontally through the thickest side, being careful not to cut all the way through.
Step 3: Stuff the Chicken
Open each chicken pocket and layer in 3-4 apple slices, a few slices of brie (about 1 oz per chicken breast), and sprinkle with thyme leaves. Gently press closed, securing with toothpicks or kitchen twine if needed.
Step 4: Season
Brush the stuffed chicken breasts with olive oil. Sprinkle evenly with garlic powder, salt, and black pepper on both sides.
Step 5: Bake
Arrange the chicken in the prepared baking dish. Bake for 25-28 minutes, or until the chicken is cooked through (internal temp: 165°F/74°C) and the cheese is melted and bubbly.
Step 6: Serve
Let rest for 5 minutes before removing toothpicks/twine. Slice and serve warm—enjoy that gooey, cheesy goodness!
Notes
- For extra color, sear the stuffed chicken in a hot skillet for 2 minutes per side before baking.
- If brie is too soft to slice, chill it in the freezer for 10 minutes first.
- Don’t skip the resting time—this helps keep the chicken extra juicy.
Variations
- Spinach & Brie: Add a handful of baby spinach leaves to the stuffing for a pop of color and nutrition.
- Bacon-Wrapped: Wrap each stuffed breast with 2 slices of bacon before baking for smoky flavor.
- Pear Substitute: Swap apple for thinly sliced ripe pear for a sweet twist.
Required Equipment
- Baking dish (9x13 inches recommended)
- Sharp chef’s knife
- Cutting board
- Toothpicks or kitchen twine
- Meat thermometer (for best results)
Storage Instructions
Store leftover Apple and Brie Stuffed Chicken in an airtight container in the refrigerator for up to 3 days. Reheat gently in the oven at 350°F (175°C) for 10-12 minutes or until warmed through. Freeze (wrapped tightly) for up to 2 months; thaw overnight in the fridge before reheating.
Suggested Pairings & Serving Recommendations
- Serve with garlic mashed potatoes or wild rice for a hearty meal.
- Pair with a crisp green salad or roasted green beans for freshness.
- Enjoy with a glass of lightly oaked Chardonnay or sparkling apple cider.
Pro Tips
- Use a meat thermometer for perfectly cooked, juicy chicken every time.
- Secure the filling well—brie gets melty and will try to ooze out (it’s okay if some does!).
- Prep ahead by stuffing chicken in the morning and baking at dinnertime.
FAQ
- Can I use chicken thighs instead of breasts?
Yes! Use boneless, skinless thighs and adjust the baking time to 18-22 minutes. - What kind of apple works best?
Honeycrisp, Gala, or Fuji apples are all fantastic for their sweetness and firmness. - Can I make this dairy-free?
Try using a creamy dairy-free cheese alternative or omit the brie for an herby apple stuffed version.
Ingredients
- 4 boneless, skinless chicken breasts
- 1 tablespoon olive oil
- 1 medium Honeycrisp or Gala apple, cored and thinly sliced
- 4 ounces brie cheese, sliced
- 2 teaspoons fresh thyme leaves (or ½ teaspoon dried thyme)
- ½ teaspoon garlic powder
- ½ teaspoon salt
- ¼ teaspoon black pepper
- Toothpicks or kitchen twine, for securing
Instructions
-
1Preheat your oven to 400°F (200°C). Lightly grease a baking dish with a bit of olive oil or nonstick spray.
-
2Pat the chicken breasts dry with paper towels. Using a sharp knife, carefully create a pocket in each chicken breast by slicing horizontally through the thickest side, being careful not to cut all the way through.
-
3Open each chicken pocket and layer in 3-4 apple slices, a few slices of brie (about 1 oz per chicken breast), and sprinkle with thyme leaves. Gently press closed, securing with toothpicks or kitchen twine if needed.
-
4Brush the stuffed chicken breasts with olive oil. Sprinkle evenly with garlic powder, salt, and black pepper on both sides.
-
5Arrange the chicken in the prepared baking dish. Bake for 25-28 minutes, or until the chicken is cooked through (internal temp: 165°F/74°C) and the cheese is melted and bubbly.
-
6Let rest for 5 minutes before removing toothpicks/twine. Slice and serve warm—enjoy that gooey, cheesy goodness!
Approximate Information for One Serving
Nutrition Disclaimers
Number of total servings shown is approximate. Actual number of servings will depend on your preferred portion sizes.
Nutritional values shown are general guidelines and reflect information for 1 serving using the ingredients listed, not including any optional ingredients. Actual macros may vary slightly depending on specific brands and types of ingredients used.
To determine the weight of one serving, prepare the recipe as instructed. Weigh the finished recipe, then divide the weight of the finished recipe (not including the weight of the container the food is in) by the desired number of servings. Result will be the weight of one serving.
Did you make this recipe?
Please consider Pinning it!


Leave a Reply