
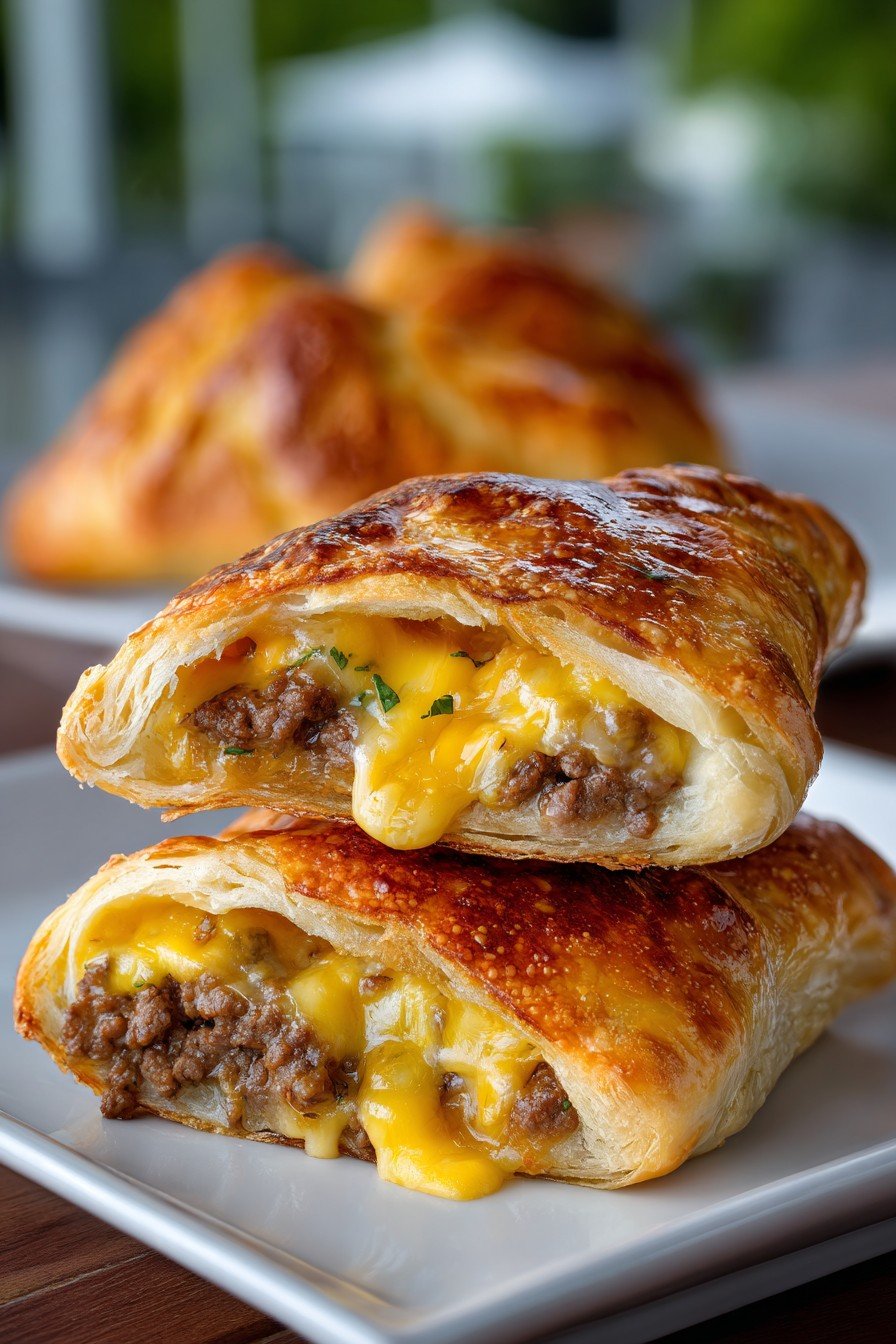
Hey y'all! If you’re looking for a fun twist on classic cheeseburgers, these homemade cheesburger pockets are just the ticket. Golden dough envelopes perfectly seasoned beef, oozy melted cheese, and your favorite fixings, making them deliciously irresistible for dinner, lunchboxes, or parties. Gather your ingredients, roll up your sleeves, and let’s get cooking!
Why You'll Love This
- All the flavors of a traditional cheeseburger, wrapped in a portable, hand-held pocket.
- Perfect for meal prep, parties, or a quick family meal — great hot or cold.
- Customizable with your favorite cheeses and toppings.
- No messy grill required; everything bakes to golden perfection in the oven.
- Freezer-friendly and ideal for make-ahead lunches!
Ingredients
- 1 pound (450g) ground beef
- 1 small onion, finely diced
- 1 teaspoon garlic powder
- ½ teaspoon salt
- ¼ teaspoon black pepper
- 2 tablespoons ketchup
- 1 tablespoon yellow mustard
- 1 tablespoon Worcestershire sauce
- 2 cups (200g) shredded cheddar cheese
- 1 can (16 oz/450g) refrigerated pizza dough (or homemade pizza dough)
- 1 large egg, beaten (for egg wash)
- Optional toppings: pickles, cooked bacon bits, sesame seeds
Directions
Prep the Oven & Ingredients
- Preheat your oven to 400°F (200°C). Line a large baking sheet with parchment paper.
Cook the Cheeseburger Filling
- In a large skillet over medium-high heat, cook the ground beef and diced onion until the beef is browned and crumbled, about 5-6 minutes. Drain excess fat as needed.
- Stir in the garlic powder, salt, black pepper, ketchup, yellow mustard, and Worcestershire sauce. Cook for 1-2 more minutes until well combined and fragrant. Remove from heat and let the mixture cool slightly.
Assemble the Pockets
- Unroll the pizza dough onto a lightly floured surface. Cut into 6 equal rectangles.
- Spoon about ¼ cup of the beef mixture onto one half of each rectangle, leaving a small border around the edges. Top the beef with a generous sprinkle of shredded cheddar cheese and any desired toppings (like pickles or bacon bits).
- Fold the empty half of each rectangle over the filling, pressing the edges together to seal. Use a fork to crimp edges and prevent leaks.
Bake the Cheesburger Pockets
- Transfer the pockets to the prepared baking sheet. Brush the tops with beaten egg and, if desired, sprinkle with sesame seeds for a classic burger touch.
- Bake for 14-16 minutes, or until the pockets are puffed and golden brown.
- Let cool for 5 minutes before serving. Enjoy warm with dipping sauce of your choice!
Notes
- If using homemade dough, roll it out to about ¼ inch thickness for best results.
- Don’t overfill the pockets or the seams may burst during baking.
- Letting the beef mixture cool slightly before assembling prevents the dough from getting soggy.
Variations
- Bacon Cheeseburger Pockets: Add ¼ cup cooked crumbled bacon to the filling for a smoky twist.
- Spicy Jalapeño Pockets: Include chopped pickled jalapeños and pepper jack cheese for extra heat.
- Veggie Lovers: Swap in diced mushrooms, bell peppers, or spinach for a delicious vegetarian option (use meatless crumbles).
Required Equipment
- Large skillet
- Baking sheet
- Parchment paper
- Mixing spoon or spatula
- Knife and cutting board
- Fork (for sealing the edges)
- Pastry brush (for the egg wash)
Storage Instructions
Store cooled cheesburger pockets in an airtight container in the refrigerator for up to 4 days. For longer storage, wrap individually, place in a zip-top bag, and freeze for up to 2 months. Reheat refrigerated pockets in a 350°F (175°C) oven for 8-10 minutes or until warmed through; if reheating from frozen, bake for 15-18 minutes.
Suggested Pairings & Serving Recommendations
- Serve with crispy fries or tater tots for a true diner experience.
- Pair with a side salad or classic coleslaw for freshness.
- Offer dipping sauces like ketchup, barbecue sauce, or spicy mayo.
Pro Tips
- Pinch and crimp all edges well to help lock in the cheesy goodness.
- Add a little extra cheese on top of the filling for extra melty pockets.
- Cool pockets on a wire rack so the bottoms stay crisp, not soggy.
FAQ
- Can I make cheesburger pockets ahead of time?
- Absolutely! Assemble them up to a day ahead and refrigerate. Bake just before serving, or bake, cool, and reheat as needed.
- Can I use other types of cheese?
- Yes! Cheddar is classic, but mozzarella, Monterey Jack, Colby, or a blend all work deliciously.
- How do I keep the pockets from bursting?
- Don’t overstuff, and make sure to seal and crimp the edges well. A fork works great for this!
Ingredients
- 1 pound (450g) ground beef
- 1 small onion, finely diced
- 1 teaspoon garlic powder
- ½ teaspoon salt
- ¼ teaspoon black pepper
- 2 tablespoons ketchup
- 1 tablespoon yellow mustard
- 1 tablespoon Worcestershire sauce
- 2 cups (200g) shredded cheddar cheese
- 1 can (16 oz/450g) refrigerated pizza dough (or homemade pizza dough)
- 1 large egg, beaten (for egg wash)
- Optional toppings: pickles, cooked bacon bits, sesame seeds
Instructions
-
1Preheat your oven to 400°F (200°C). Line a large baking sheet with parchment paper.
-
2In a large skillet over medium-high heat, cook the ground beef and diced onion until the beef is browned and crumbled, about 5-6 minutes. Drain excess fat as needed.
-
3Stir in the garlic powder, salt, black pepper, ketchup, yellow mustard, and Worcestershire sauce. Cook for 1-2 more minutes until well combined and fragrant. Remove from heat and let the mixture cool slightly.
-
4Unroll the pizza dough onto a lightly floured surface. Cut into 6 equal rectangles.
-
5Spoon about ¼ cup of the beef mixture onto one half of each rectangle, leaving a small border around the edges. Top the beef with a generous sprinkle of shredded cheddar cheese and any desired toppings (like pickles or bacon bits).
-
6Fold the empty half of each rectangle over the filling, pressing the edges together to seal. Use a fork to crimp edges and prevent leaks.
-
7Transfer the pockets to the prepared baking sheet. Brush the tops with beaten egg and, if desired, sprinkle with sesame seeds for a classic burger touch.
-
8Bake for 14-16 minutes, or until the pockets are puffed and golden brown.
-
9Let cool for 5 minutes before serving. Enjoy warm with dipping sauce of your choice!
Approximate Information for One Serving
Nutrition Disclaimers
Number of total servings shown is approximate. Actual number of servings will depend on your preferred portion sizes.
Nutritional values shown are general guidelines and reflect information for 1 serving using the ingredients listed, not including any optional ingredients. Actual macros may vary slightly depending on specific brands and types of ingredients used.
To determine the weight of one serving, prepare the recipe as instructed. Weigh the finished recipe, then divide the weight of the finished recipe (not including the weight of the container the food is in) by the desired number of servings. Result will be the weight of one serving.
Did you make this recipe?
Please consider Pinning it!


Leave a Reply