
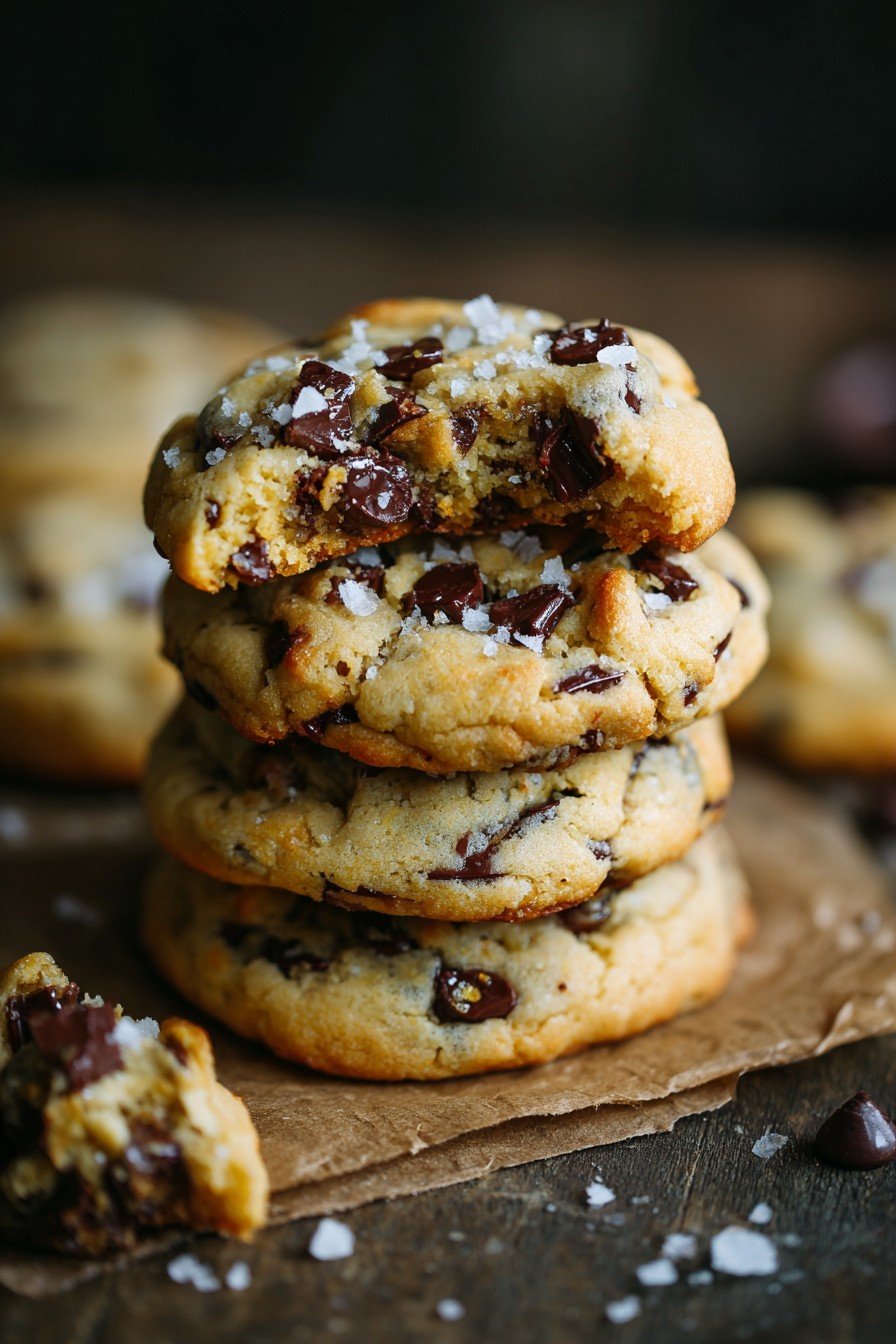
Hey y'all! If you adore the tangy richness of cheesecake and the gooey charm of chocolate chip cookies, you’re in for a delicious surprise. Chocolate Chip Cheesecake Cookies blend the best of both worlds: a soft, creamy cookie studded with melty chocolate chips and a subtle cheesecake tang in every bite. They’re perfect for parties, bake sales, afternoon treats, or just because you deserve it. Let’s get cooking!
Why You'll Love This
- Ultimate Texture: Soft and chewy with creamy centers and crisp edges.
- Easy to Make: Simple ingredients and beginner-friendly instructions.
- Two Desserts in One: Combines everyone’s favorite cheesecake and cookie into a single bite.
- Perfect for Any Occasion: Great for gatherings, gifts, or satisfying your sweet tooth.
- Customizable: Easily change up the mix-ins or make them gluten-free!
Ingredients
- ½ cup (113g) unsalted butter, softened
- 4 oz (113g) cream cheese, softened
- ¾ cup (150g) granulated sugar
- ¼ cup (50g) brown sugar, packed
- 1 large egg
- 2 teaspoon vanilla extract
- 1 ¾ cups (220g) all-purpose flour
- ½ teaspoon baking soda
- ½ teaspoon baking powder
- ½ teaspoon salt
- 1 ¼ cups (210g) chocolate chips (semisweet or milk)
Directions
Step 1: Prep the Oven & Pans
Preheat your oven to 350°F (175°C) and line two large baking sheets with parchment paper.
Step 2: Cream Butter, Cream Cheese & Sugars
In a large mixing bowl, beat together the softened butter and cream cheese until smooth and creamy. Add both sugars and beat until light and fluffy, about 2-3 minutes.
Step 3: Add Egg & Vanilla
Mix in the egg and vanilla extract, blending until smooth and fully incorporated.
Step 4: Combine Dry Ingredients
In a separate bowl, whisk together the flour, baking soda, baking powder, and salt.
Step 5: Mix Wet & Dry Ingredients
Gradually add the dry mixture to the wet ingredients, mixing on low speed just until combined. Do not overmix.
Step 6: Add Chocolate Chips
Fold in the chocolate chips evenly throughout the dough.
Step 7: Chill Dough
Cover the bowl with plastic wrap and chill the dough in the refrigerator for at least 30 minutes (up to 2 hours for thicker cookies).
Step 8: Scoop & Bake
Drop heaping tablespoons of dough (about 2 tablespoons per cookie) 2 inches apart on the prepared baking sheets. Bake for 11-13 minutes, or until the edges are set and the centers appear slightly underbaked.
Step 9: Cool & Enjoy
Allow cookies to cool on the baking sheet for 5 minutes before transferring to a wire rack to cool completely. Enjoy the soft, creamy, chocolate-studded treats!
Notes
- Use full-fat cream cheese for the creamiest centers.
- Do not overbake—the cookies should look just barely done in the center for soft texture.
- Chill the dough for at least 30 minutes for thick, bakery-style cookies.
Variations
- White Chocolate Raspberry: Swap semisweet chips for white chocolate and fold in ⅓ cup freeze-dried raspberries.
- Oreo Cheesecake Cookies: Stir in 1 cup crushed Oreo cookies with the chocolate chips.
- Nutty Delight: Add ½ cup chopped pecans or walnuts to the dough.
Required Equipment
- Mixing bowls
- Electric hand mixer or stand mixer
- Rubber spatula
- Baking sheets
- Parchment paper
- Wire cooling rack
- Cookie scoop (optional)
Storage Instructions
- Room Temperature: Store cookies in an airtight container at room temperature for up to 4 days.
- Refrigerator: For a firmer texture, keep cookies chilled; they’ll stay fresh for up to 1 week.
- Freezer: Freeze baked cookies (layered between parchment) for up to 2 months. Thaw at room temperature before serving.
Pairings & Serving Recommendations
- Pair with a tall glass of cold milk for the classic cookie experience.
- Serve with hot coffee or rich cocoa for a cozy treat.
- For celebration, crumble cookies over vanilla ice cream and drizzle with chocolate sauce.
Pro Tips
- Use room-temperature butter and cream cheese for smooth blending.
- Slightly underbake for that soft, gooey middle.
- Press a few extra chocolate chips on top of each dough ball before baking for a bakery look.
Frequently Asked Questions (FAQ)
Can I make the dough ahead of time?
Absolutely! Prepare the dough up to 48 hours in advance, chill, then bake when ready.
What if I don't have a mixer?
You can mix everything by hand with a sturdy spatula—it just takes a bit more elbow grease!
Can these cookies be made gluten-free?
Yes! Substitute the all-purpose flour with your favorite 1:1 gluten-free baking flour blend.
Ingredients
- ½ cup (113g) unsalted butter, softened
- 4 oz (113g) cream cheese, softened
- ¾ cup (150g) granulated sugar
- ¼ cup (50g) brown sugar, packed
- 1 large egg
- 2 teaspoon vanilla extract
- 1 ¾ cups (220g) all-purpose flour
- ½ teaspoon baking soda
- ½ teaspoon baking powder
- ½ teaspoon salt
- 1 ¼ cups (210g) chocolate chips (semisweet or milk)
Instructions
-
1Preheat your oven to 350°F (175°C) and line two large baking sheets with parchment paper.
-
2In a large mixing bowl, beat together the softened butter and cream cheese until smooth and creamy. Add both sugars and beat until light and fluffy, about 2-3 minutes.
-
3Mix in the egg and vanilla extract, blending until smooth and fully incorporated.
-
4In a separate bowl, whisk together the flour, baking soda, baking powder, and salt.
-
5Gradually add the dry mixture to the wet ingredients, mixing on low speed just until combined. Do not overmix.
-
6Fold in the chocolate chips evenly throughout the dough.
-
7Cover the bowl with plastic wrap and chill the dough in the refrigerator for at least 30 minutes (up to 2 hours for thicker cookies).
-
8Drop heaping tablespoons of dough (about 2 tablespoons per cookie) 2 inches apart on the prepared baking sheets. Bake for 11-13 minutes, or until the edges are set and the centers appear slightly underbaked.
-
9Allow cookies to cool on the baking sheet for 5 minutes before transferring to a wire rack to cool completely. Enjoy the soft, creamy, chocolate-studded treats!
Approximate Information for One Serving
Nutrition Disclaimers
Number of total servings shown is approximate. Actual number of servings will depend on your preferred portion sizes.
Nutritional values shown are general guidelines and reflect information for 1 serving using the ingredients listed, not including any optional ingredients. Actual macros may vary slightly depending on specific brands and types of ingredients used.
To determine the weight of one serving, prepare the recipe as instructed. Weigh the finished recipe, then divide the weight of the finished recipe (not including the weight of the container the food is in) by the desired number of servings. Result will be the weight of one serving.
Did you make this recipe?
Please consider Pinning it!


Leave a Reply