
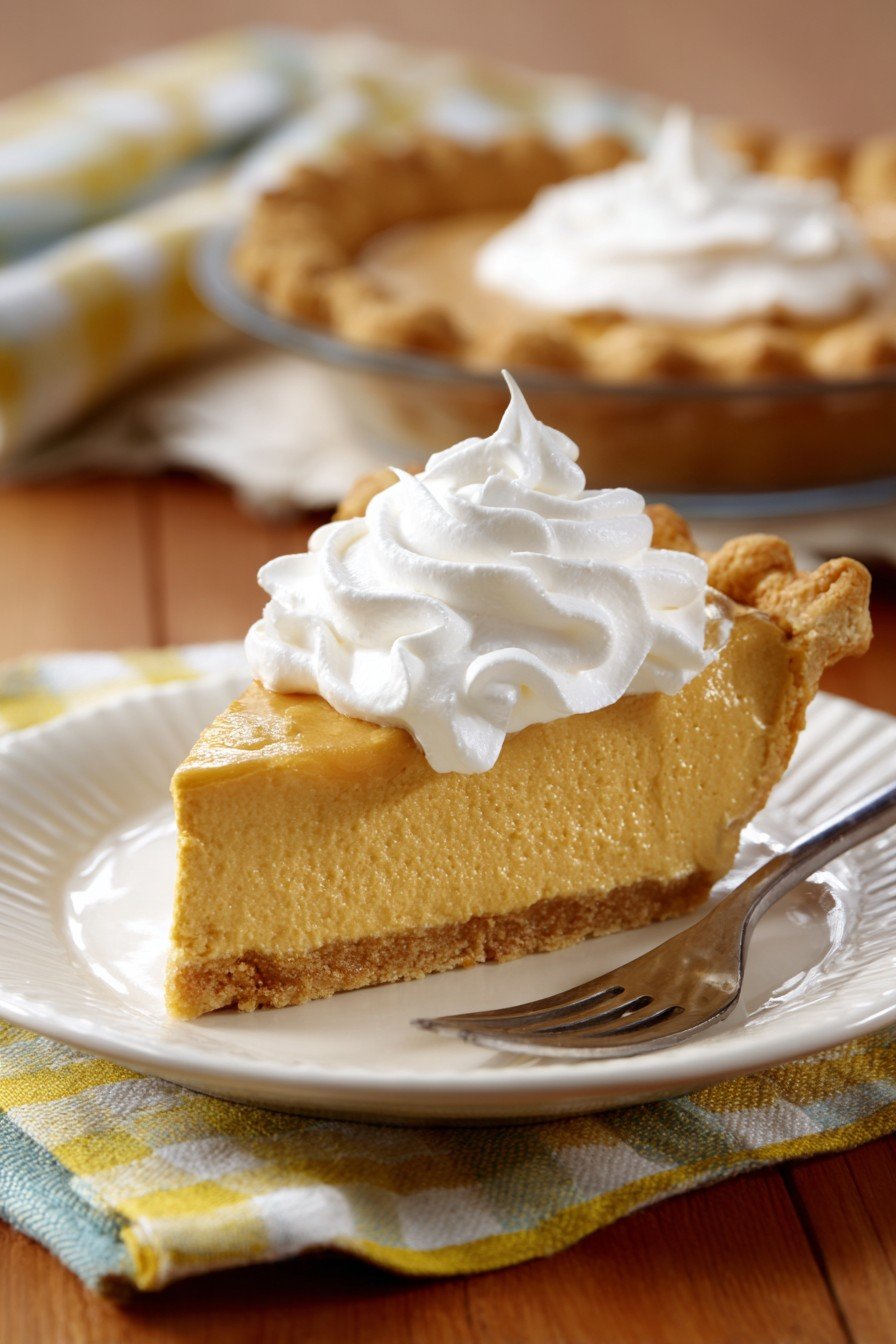
Hey y'all! If you’re in the mood for a taste of pure Southern comfort, Dolly Parton’s Creamy Butterscotch Pie is calling your name. With a buttery, flaky crust and a silky-smooth butterscotch filling, this classic pie is as sweet and golden as Dolly herself! Whether it’s for a holiday meal, Sunday supper, or just because you need a little extra sweetness in your life, this pie never fails to impress. Let’s get cooking!
Why You'll Love This
- Incredibly creamy, melt-in-your-mouth butterscotch filling that will wow your guests.
- Simple ingredients easily found in any grocery store.
- Perfect for make-ahead entertaining and potlucks.
- Versatile—you can top it with whipped cream, meringue, or enjoy as is!
- Nostalgic, old-fashioned flavor just like home.
Ingredients
- 1 (9-inch) pre-baked pie crust (homemade or store-bought)
- 1 cup packed light brown sugar
- ⅓ cup cornstarch
- ½ teaspoon salt
- 2 cups whole milk
- ½ cup heavy cream
- 4 large egg yolks
- 3 tablespoons unsalted butter
- 2 teaspoons pure vanilla extract
- Whipped cream, for topping (optional)
- Butterscotch chips or pecans, for garnish (optional)
Directions
Step 1: Prepare the Pie Crust
- If using homemade or store-bought dough, roll out and fit into a 9-inch pie plate. Bake according to package or recipe instructions and let cool.
Step 2: Make the Butterscotch Filling
- In a medium saucepan, whisk together the brown sugar, cornstarch, and salt. Gradually whisk in the milk and heavy cream until smooth.
- Place saucepan over medium heat, stirring often, until mixture begins to thicken and bubble, about 7–9 minutes.
Step 3: Temper the Egg Yolks
- In a medium bowl, whisk egg yolks. Slowly pour about ½ cup of the hot milk mixture into the egg yolks, whisking constantly to temper, then pour the egg mixture back into the pan.
Step 4: Finish the Filling
- Continue to cook over medium-low heat, stirring constantly, until thick and pudding-like, about 2–3 more minutes. Remove from heat and stir in butter and vanilla extract until melted and smooth.
Step 5: Assemble and Cool
- Pour the creamy butterscotch filling into the cooled, pre-baked crust. Smooth the top with a spatula.
- Press a piece of plastic wrap directly on the pie filling’s surface to prevent a skin from forming. Refrigerate until completely chilled and set, at least 4 hours or overnight.
Step 6: Serve and Enjoy
- Before serving, top with whipped cream and a sprinkle of butterscotch chips or toasted pecans, if desired. Slice and savor every sweet bite!
Notes
- For best texture, be sure to refrigerate the pie for a minimum of 4 hours before slicing.
- If you prefer a lighter version, you can use half-and-half in place of heavy cream.
- To avoid lumps in your filling, whisk constantly and don’t let the mixture boil rapidly.
Variations
- Meringue-topped: Spread a fluffy meringue on top and brown under the broiler.
- Chocolate Drizzle: Swirl melted chocolate over the whipped cream topping.
- Nutty Crunch: Add a layer of chopped toasted pecans to the bottom of the crust before pouring in the filling.
Required Equipment
- 9-inch pie plate
- Medium saucepan
- Whisk
- Mixing bowls
- Plastic wrap
- Spatula
Storage Instructions
Store covered in the refrigerator for up to 3 days. For best texture, keep plastic wrap pressed directly against the surface. Do not freeze, as the custard may separate.
Serving Recommendations
- Pair each slice with a hot cup of coffee or sweet tea.
- Delicious with a scoop of vanilla bean ice cream on the side.
- Ideal for potlucks, holiday gatherings, or a cozy weeknight dessert.
Pro Tips
- Use whole milk for a rich, creamy texture that sets perfectly.
- After pouring the filling into the crust, tap the pie gently on the counter to remove any air bubbles.
- Let the pie cool at room temperature before refrigerating to prevent excess condensation.
FAQ
- Can I use dark brown sugar instead of light?
- Yes, but it will yield a deeper molasses flavor and darker color.
- Can I make this pie ahead of time?
- Absolutely! Prepare it a day in advance and keep refrigerated until serving.
- Is it possible to make this gluten-free?
- Yes, use a gluten-free pie crust—no need to adjust the filling as it's naturally gluten-free!
Ingredients
- 1 (9-inch) pre-baked pie crust (homemade or store-bought)
- 1 cup packed light brown sugar
- ⅓ cup cornstarch
- ½ teaspoon salt
- 2 cups whole milk
- ½ cup heavy cream
- 4 large egg yolks
- 3 tablespoons unsalted butter
- 2 teaspoons pure vanilla extract
- Whipped cream, for topping (optional)
- Butterscotch chips or pecans, for garnish (optional)
Instructions
-
1If using homemade or store-bought dough, roll out and fit into a 9-inch pie plate. Bake according to package or recipe instructions and let cool.
-
2In a medium saucepan, whisk together the brown sugar, cornstarch, and salt. Gradually whisk in the milk and heavy cream until smooth.
-
3Place saucepan over medium heat, stirring often, until mixture begins to thicken and bubble, about 7–9 minutes.
-
4In a medium bowl, whisk egg yolks. Slowly pour about ½ cup of the hot milk mixture into the egg yolks, whisking constantly to temper, then pour the egg mixture back into the pan.
-
5Continue to cook over medium-low heat, stirring constantly, until thick and pudding-like, about 2–3 more minutes. Remove from heat and stir in butter and vanilla extract until melted and smooth.
-
6Pour the creamy butterscotch filling into the cooled, pre-baked crust. Smooth the top with a spatula.
-
7Press a piece of plastic wrap directly on the pie filling’s surface to prevent a skin from forming. Refrigerate until completely chilled and set, at least 4 hours or overnight.
-
8Before serving, top with whipped cream and a sprinkle of butterscotch chips or toasted pecans, if desired. Slice and savor every sweet bite!
Approximate Information for One Serving
Nutrition Disclaimers
Number of total servings shown is approximate. Actual number of servings will depend on your preferred portion sizes.
Nutritional values shown are general guidelines and reflect information for 1 serving using the ingredients listed, not including any optional ingredients. Actual macros may vary slightly depending on specific brands and types of ingredients used.
To determine the weight of one serving, prepare the recipe as instructed. Weigh the finished recipe, then divide the weight of the finished recipe (not including the weight of the container the food is in) by the desired number of servings. Result will be the weight of one serving.
Did you make this recipe?
Please consider Pinning it!

Leave a Reply