
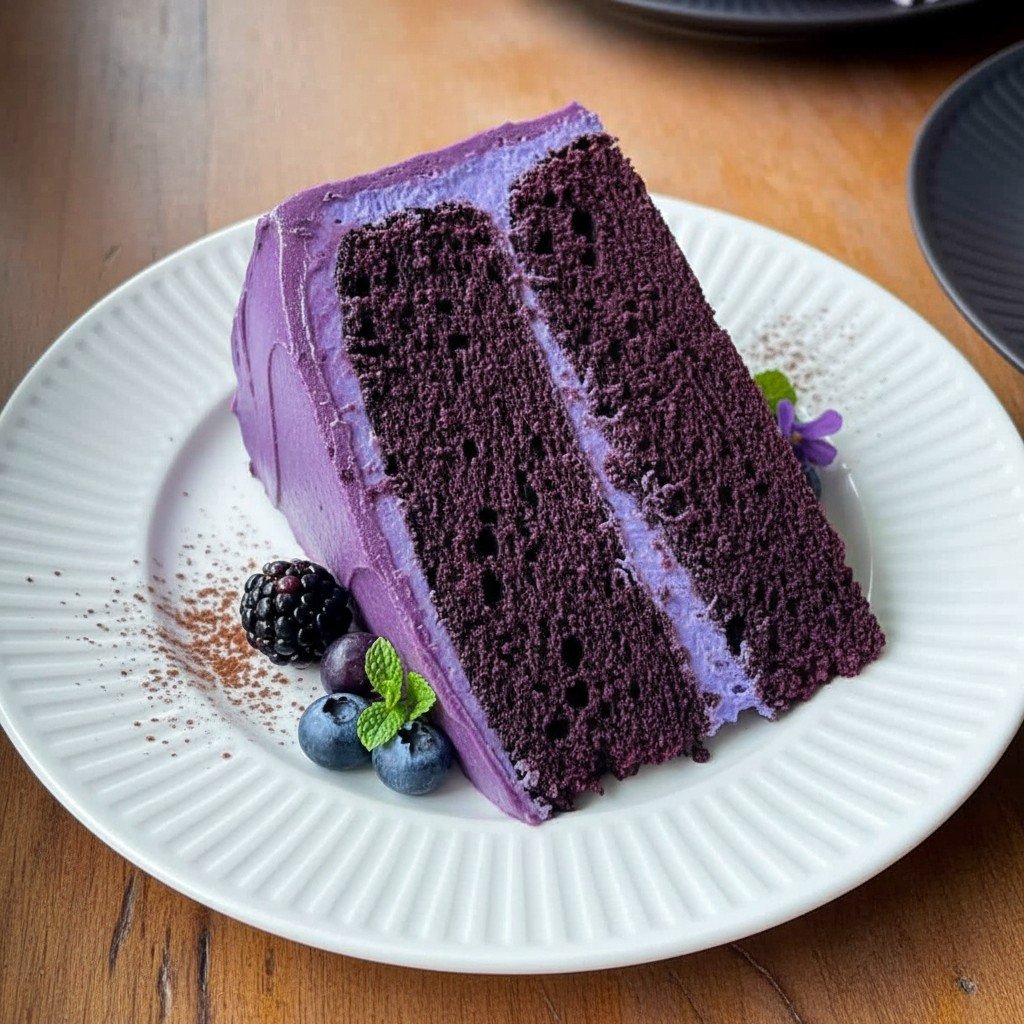
Hey y'all! If you're looking for a showstopping cake that's as beautiful as it is delicious, you're going to love these purple velvet cake recipes. With their rich, moist crumb and striking violet hue, these cakes are guaranteed to steal the spotlight at birthdays, showers, or any festive gathering. Each bite delivers a hint of cocoa, the creaminess of buttermilk, and a sweetness that's just right. Let's get cooking!
Why You’ll Love This
- Eye-catching color that transforms any celebration into a magical occasion.
- Super moist, tender crumb thanks to buttermilk and oil.
- Easy to customize with food coloring or natural purple foods.
- Pairs perfectly with classic cream cheese or vanilla buttercream frosting.
- It's a conversation starter—everyone wants to know what makes it purple and so tasty!
Ingredients
- 2 ½ cups (315g) all-purpose flour
- 1 ½ cups (300g) granulated sugar
- 1 teaspoon baking soda
- 1 teaspoon fine salt
- 1 tablespoon unsweetened cocoa powder
- 1 ½ cups (360ml) vegetable oil
- 1 cup (240ml) buttermilk, room temperature
- 2 large eggs, room temperature
- 2 tablespoons (30ml) purple gel food coloring
- 1 teaspoon vanilla extract
- 1 teaspoon white vinegar
- ½ cup (120ml) hot water
- Optional: ½ teaspoon ube extract (for a natural purple hue and subtle flavor)
Directions
Step 1: Prep Your Oven and Pans
Preheat your oven to 350°F (175°C). Grease and flour two 8-inch round cake pans, lining the bottoms with parchment for easy release.
Step 2: Mix Dry Ingredients
In a large bowl, whisk together the flour, sugar, baking soda, salt, and cocoa powder until fully combined.
Step 3: Combine Wet Ingredients
In a second bowl, mix the oil, buttermilk, eggs, purple food coloring, vanilla extract, and (if using) ube extract. Whisk until evenly blended and vibrantly colored.
Step 4: Bring it All Together
Gradually combine the wet and dry mixtures, stirring just until smooth. Add the vinegar and hot water, mixing briefly until the batter is silky and evenly purple.
Step 5: Bake
Divide the batter evenly between your prepared pans. Bake for 28-32 minutes, or until a toothpick inserted in the center comes out clean.
Step 6: Cool and Frost
Let the cakes cool in pans for 10 minutes, then transfer to a wire rack to cool completely. Frost as desired—cream cheese frosting is a classic choice!
Notes
- For a deeper purple shade, add a bit more gel coloring or a few drops of ube extract.
- Room temperature eggs and buttermilk make the batter blend more easily for a tender crumb.
- Be sure not to overmix—stop as soon as the batter is smooth.
Variations
- Natural Dye Version: Substitute some food coloring with puréed purple sweet potato or blueberries for a natural tint.
- Gluten-Free Purple velvet: Use a gluten-free all-purpose flour blend instead of regular flour.
- Vegan Purple Velvet Cake: Swap eggs for flax eggs, dairy for plant-based milk with lemon juice, and use vegan frosting.
Required Equipment
- Two 8-inch round cake pans
- Mixing bowls
- Whisk and spatula
- Electric mixer (optional but makes things easier!)
- Wire cooling rack
- Measuring cups and spoons
Storage Instructions
- Store leftover cake in an airtight container at room temperature for up to 2 days.
- For longer storage, refrigerate for up to 5 days—bring to room temperature before serving for best texture.
- Unfrosted cakes can be wrapped well and frozen for up to 2 months.
Suggested Pairings/Serving Recommendations
- Serve slices with extra dollops of cream cheese frosting.
- Top with fresh berries, especially blueberries or blackberries, for a fruity contrast.
- A cold glass of milk, a cup of coffee, or a pot of earl grey tea are all fabulous alongside!
Pro Tips
- Use gel food coloring for vibrant, deep color with less liquid—liquid food coloring can dilute your batter.
- Don’t skip greasing and lining your pans—it ensures the cakes release perfectly every time!
- Weigh your flour if possible for the most accurate, tender crumb.
FAQ
- Can I use regular food coloring? Yes, but gel provides a more saturated color without overpowering the batter with liquid.
- Is ube extract necessary? No—it adds flavor and boosts the purple shade, but food coloring alone works great for color.
- Can I make this cake ahead? Absolutely! Bake the cake layers up to 2 days ahead and frost the day you’re serving.
Ingredients
- 2 ½ cups (315g) all-purpose flour
- 1 ½ cups (300g) granulated sugar
- 1 teaspoon baking soda
- 1 teaspoon fine salt
- 1 tablespoon unsweetened cocoa powder
- 1 ½ cups (360ml) vegetable oil
- 1 cup (240ml) buttermilk, room temperature
- 2 large eggs, room temperature
- 2 tablespoons (30ml) purple gel food coloring
- 1 teaspoon vanilla extract
- 1 teaspoon white vinegar
- ½ cup (120ml) hot water
- Optional: ½ teaspoon ube extract (for a natural purple hue and subtle flavor)
Instructions
-
1Preheat your oven to 350°F (175°C). Grease and flour two 8-inch round cake pans, lining the bottoms with parchment for easy release.
-
2In a large bowl, whisk together the flour, sugar, baking soda, salt, and cocoa powder until fully combined.
-
3In a second bowl, mix the oil, buttermilk, eggs, purple food coloring, vanilla extract, and (if using) ube extract. Whisk until evenly blended and vibrantly colored.
-
4Gradually combine the wet and dry mixtures, stirring just until smooth. Add the vinegar and hot water, mixing briefly until the batter is silky and evenly purple.
-
5Divide the batter evenly between your prepared pans. Bake for 28-32 minutes, or until a toothpick inserted in the center comes out clean.
-
6Let the cakes cool in pans for 10 minutes, then transfer to a wire rack to cool completely. Frost as desired—cream cheese frosting is a classic choice!
Approximate Information for One Serving
Nutrition Disclaimers
Number of total servings shown is approximate. Actual number of servings will depend on your preferred portion sizes.
Nutritional values shown are general guidelines and reflect information for 1 serving using the ingredients listed, not including any optional ingredients. Actual macros may vary slightly depending on specific brands and types of ingredients used.
To determine the weight of one serving, prepare the recipe as instructed. Weigh the finished recipe, then divide the weight of the finished recipe (not including the weight of the container the food is in) by the desired number of servings. Result will be the weight of one serving.
Did you make this recipe?
Please consider Pinning it!
Leave a Reply