
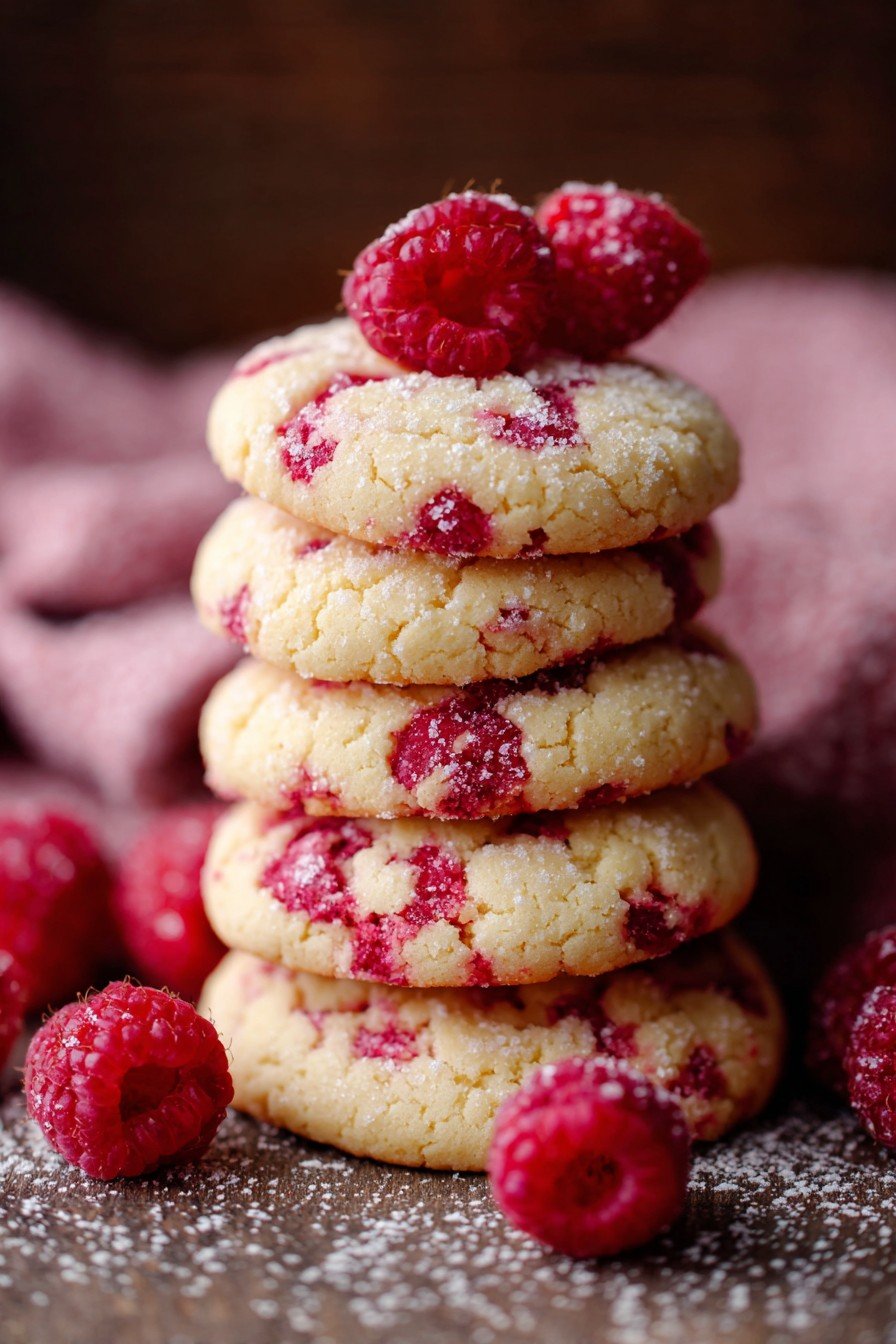
Hey y'all! If you love cookies that are pillowy-soft, bursting with real raspberry flavor, and sweet in every bite, you have got to try these Soft and Chewy Raspberry Sugar Cookies. They're perfect for bake sales, birthdays, afternoon coffee breaks, or anytime you want to treat yourself to something fruity and fabulous. Plus, they're so easy to whip up, anyone can master them! Let's get baking!
Why You'll Love This
- Each cookie is perfectly soft and chewy with tangy raspberry pockets in every bite.
- No chilling required – mix, bake, and enjoy in under 30 minutes.
- Uses fresh or frozen raspberries for year-round deliciousness.
- These cookies keep beautifully, making them great for gifts or make-ahead treats.
- Simple ingredients and straightforward steps – beginner-friendly!
Ingredients
- 2 ½ cups (315g) all-purpose flour
- ½ teaspoon baking soda
- ½ teaspoon cream of tartar
- ¼ teaspoon salt
- 1 cup (226g) unsalted butter, softened
- 1 ½ cups (300g) granulated sugar, plus ¼ cup for rolling
- 1 large egg
- 1 ½ teaspoons pure vanilla extract
- ¾ cup chopped fresh raspberries (or frozen, thawed and drained)
- Optional: Pink sanding sugar for sparkle
Directions
Prep the Oven and Baking Sheets
- Preheat your oven to 350°F (175°C). Line two baking sheets with parchment paper or silicone mats.
Mix the Dry Ingredients
- In a medium bowl, whisk together the flour, baking soda, cream of tartar, and salt. Set aside.
Cream Butter and Sugar
- In a large bowl, beat the softened butter and 1 ½ cups sugar with an electric mixer on medium speed until light and fluffy, about 2–3 minutes.
Add Egg and Vanilla
- Add the egg and vanilla extract to the butter mixture. Beat until well combined.
Combine Wet and Dry
- Gradually add the dry ingredients to the wet ingredients, mixing on low just until combined. Do not overmix.
Fold in Raspberries
- Gently fold in the chopped raspberries, being careful not to smash them completely into the dough.
Shape and Sugar-Coat
- Scoop out 2-tablespoon sized portions of dough and roll each into a ball. Gently roll them in the remaining ¼ cup sugar (and optional sanding sugar), then place 2 inches apart on prepared baking sheets.
Bake to Perfection
- Bake for 11–13 minutes, until the edges are set but the centers still look soft and puffy. Do not overbake!
Cool and Enjoy
- Let the cookies cool on the baking sheet for 5 minutes, then transfer to a wire rack to cool completely.
Notes
- If using frozen raspberries, be sure they're thawed and well-drained to avoid extra moisture.
- Cookies will look soft when you pull them out of the oven, but will firm up as they cool.
- For a brighter pink color, fold raspberries in gently to avoid bleeding.
Variations
- White Chocolate Raspberry: Fold in ½ cup white chocolate chips along with the raspberries.
- Lemon Raspberry: Add 1 tablespoon fresh lemon zest to the dough for a citrusy twist.
- Gluten-Free: Substitute a 1:1 gluten-free flour blend for the all-purpose flour.
Required Equipment
- Mixing bowls
- Electric mixer (handheld or stand)
- Measuring cups and spoons
- Baking sheets
- Parchment paper or silicone baking mats
- Wire cooling rack
- Cookie scoop (optional)
Storage Instructions
Store cooled cookies in an airtight container at room temperature for up to 4 days. For longer storage, freeze cookies in a single layer, then transfer to a freezer-safe bag or container for up to 2 months. Thaw at room temperature before enjoying.
Suggested Pairings & Serving Recommendations
- Pair these fruity cookies with a glass of icy-cold milk or a cup of creamy vanilla latte.
- They make a festive addition to spring and summer dessert platters.
- Serve with a scoop of vanilla or raspberry sorbet for a show-stopping treat.
Pro Tips
- Use room temperature butter and egg for the fluffiest cookie texture.
- Don't overmix the dough, especially after adding raspberries—they keep their shape best with a gentle hand.
- Chill the dough for 20 minutes if it's very soft, especially on warm days, to prevent excess spreading.
FAQ
Can I use raspberry jam instead of fresh raspberries?
It's best to use whole raspberries for bursts of flavor and the signature flecked look—jam can make the dough too sticky and changes the texture.
Do these cookies freeze well?
Yes! Once cooled, freeze them in a single layer, then store in bags or containers for up to 2 months. Thaw at room temperature before serving.
Can I double the recipe?
Absolutely—just use a larger bowl or stand mixer, and bake in batches as needed.
Prep Time: 15 minutes
Cook Time: 12 minutes
Total Time: 27 minutes
Yield: About 24 cookies
Ingredients
- 2 ½ cups (315g) all-purpose flour
- ½ teaspoon baking soda
- ½ teaspoon cream of tartar
- ¼ teaspoon salt
- 1 cup (226g) unsalted butter, softened
- 1 ½ cups (300g) granulated sugar, plus ¼ cup for rolling
- 1 large egg
- 1 ½ teaspoons pure vanilla extract
- ¾ cup chopped fresh raspberries (or frozen, thawed and drained)
- Optional: Pink sanding sugar for sparkle
Instructions
-
1Preheat your oven to 350°F (175°C). Line two baking sheets with parchment paper or silicone mats.
-
2In a medium bowl, whisk together the flour, baking soda, cream of tartar, and salt. Set aside.
-
3In a large bowl, beat the softened butter and 1 ½ cups sugar with an electric mixer on medium speed until light and fluffy, about 2–3 minutes.
-
4Add the egg and vanilla extract to the butter mixture. Beat until well combined.
-
5Gradually add the dry ingredients to the wet ingredients, mixing on low just until combined. Do not overmix.
-
6Gently fold in the chopped raspberries, being careful not to smash them completely into the dough.
-
7Scoop out 2-tablespoon sized portions of dough and roll each into a ball. Gently roll them in the remaining ¼ cup sugar (and optional sanding sugar), then place 2 inches apart on prepared baking sheets.
-
8Bake for 11–13 minutes, until the edges are set but the centers still look soft and puffy. Do not overbake!
-
9Let the cookies cool on the baking sheet for 5 minutes, then transfer to a wire rack to cool completely.
Approximate Information for One Serving
Nutrition Disclaimers
Number of total servings shown is approximate. Actual number of servings will depend on your preferred portion sizes.
Nutritional values shown are general guidelines and reflect information for 1 serving using the ingredients listed, not including any optional ingredients. Actual macros may vary slightly depending on specific brands and types of ingredients used.
To determine the weight of one serving, prepare the recipe as instructed. Weigh the finished recipe, then divide the weight of the finished recipe (not including the weight of the container the food is in) by the desired number of servings. Result will be the weight of one serving.
Did you make this recipe?
Please consider Pinning it!

Leave a Reply