
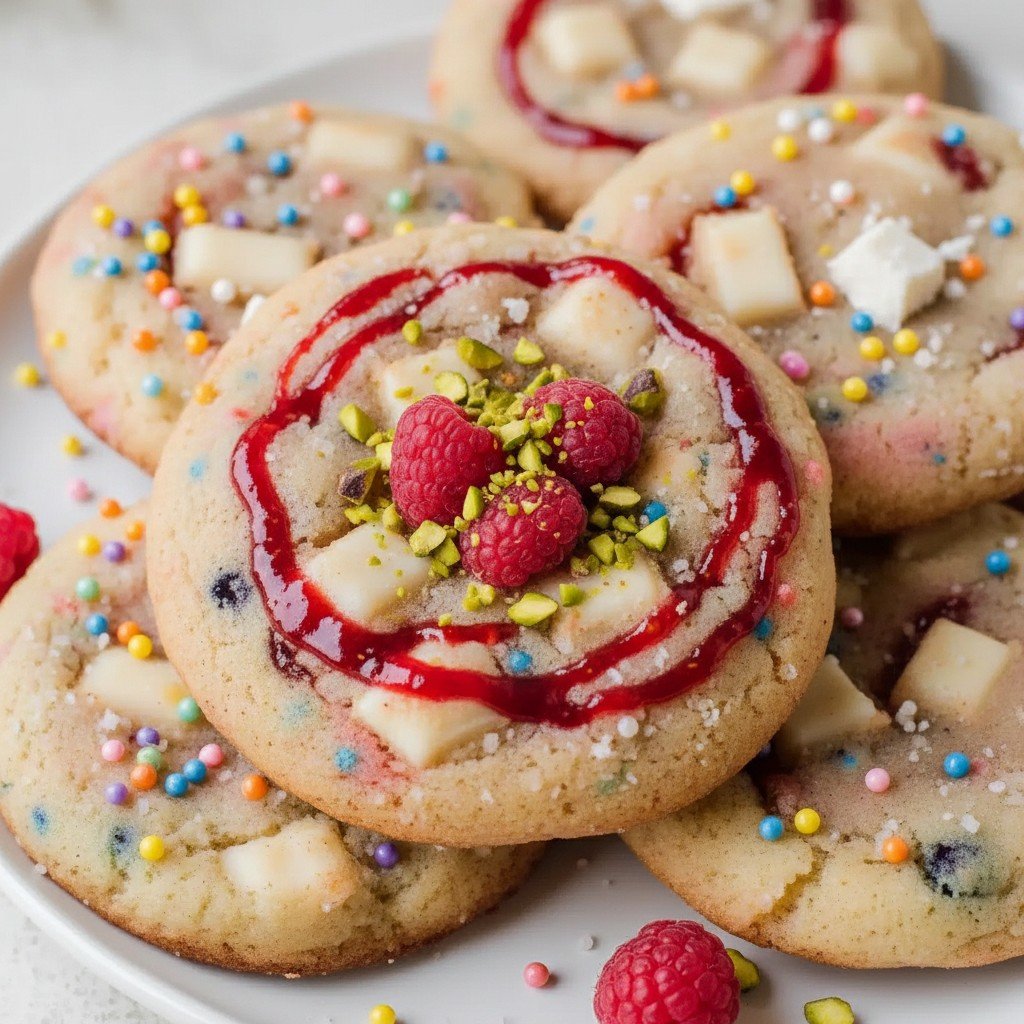
Hey y'all! If you love nostalgic treats with a creative twist, you're in for a treat with these Strawberry Pop Tart Sugar Cookies. Buttery sugar cookie dough wraps around fruity strawberry jam and is glazed with a sweet vanilla icing—just like your favorite childhood pastry, reimagined into a soft, chewy cookie! They’re perfect for birthday parties, bake sales, or just when you crave a fun, homemade snack. Let's get cooking!
Why You'll Love This
- Playful & Nostalgic – They capture the classic Pop Tart flavor in cookie form.
- Soft and Chewy – Buttery sugar cookie base with a tender, melt-in-your-mouth texture.
- Real Strawberry Filling – Bursting with fruity jam in every bite.
- Fun to Decorate – The glaze and sprinkles add fun and make them look adorable.
- Crowd-Pleaser – Kids and adults alike will adore these cookies.
Ingredients
- 2 ½ cups all-purpose flour
- ½ teaspoon baking powder
- ½ teaspoon salt
- 1 cup (2 sticks) unsalted butter, softened
- 1 cup granulated sugar
- 1 large egg
- 2 teaspoons vanilla extract
- ¼ cup strawberry jam (more as needed)
- 1 cup powdered sugar
- 2–3 tablespoons milk
- ½ teaspoon vanilla extract (for glaze)
- Pink or red food coloring (optional, for glaze)
- Sprinkles (for decorating)
Directions
Prep the Cookie Dough
- In a medium bowl, whisk together flour, baking powder, and salt. Set aside.
- In a large bowl, cream the softened butter and granulated sugar with a hand mixer until light and fluffy, about 2–3 minutes.
- Beat in the egg and vanilla extract until fully combined.
- Gradually mix the dry ingredients into the wet, scraping the bowl, until a soft sugar cookie dough forms.
- Chill the dough in the refrigerator for 30 minutes for easier handling.
Assemble the cookies
- Preheat your oven to 350°F (175°C). Line two baking sheets with parchment paper.
- Scoop out 2-tablespoon portions of dough and flatten each into a disc.
- Add 1 teaspoon of strawberry jam to the center of each disc. Fold and pinch the dough around the jam, then roll gently into a ball, sealing well.
- Place the balls on the baking sheet, leaving 2 inches between each, and gently flatten the tops.
Bake
- Bake for 11–13 minutes, or until the edges are just set and barely golden. The centers will look soft.
- Let cookies cool on the sheet for 5 minutes, then transfer to a wire rack to cool completely.
Glaze and Decorate
- In a small bowl, whisk powdered sugar, milk, vanilla extract, and food coloring (if using) until a smooth, pourable glaze forms.
- Spoon glaze over each cooled cookie, then immediately top with sprinkles. Let set 20–30 minutes.
Notes
- Chill the dough well to prevent spreading and make sealing the jam easier.
- Don’t overbake—remove when edges are set and centers look slightly underdone for a chewy texture.
- Let glaze fully set before storing or stacking.
Variations
- Swap strawberry jam for raspberry, blueberry, or mixed berry jam.
- Add a bit of almond extract to the dough for a bakery-inspired flavor.
- Make mini cookies for party platters by halving the dough balls and jam amount.
Required Equipment
- Mixing bowls
- Hand or stand mixer
- Baking sheets
- Parchment paper
- Wire cooling rack
- Measuring cups and spoons
Storage Instructions
Store cookies in an airtight container at room temperature for up to 4 days, or in the fridge for up to 1 week. For longer storage, freeze glazed cookies between layers of wax paper for up to 2 months.
Suggested Pairings & Serving Recommendations
- Enjoy with a cold glass of milk or a mug of vanilla latte.
- Serve as a sweet brunch treat alongside fresh fruit.
- Pack in lunchboxes for a fun midday surprise!
Pro Tips
- Seal dough edges securely to keep jam from leaking while baking.
- For neat glazing, let cookies cool completely and use a spoon to drizzle slowly.
- Dust with extra powdered sugar before serving for a bakery look.
FAQ
- Can I use store-bought sugar cookie dough?
- Yes! Use about 16 oz of dough and follow the same stuffing and baking instructions.
- How do I prevent the jam from leaking out?
- Make sure to chill the dough, use thick jam, and pinch all edges very well.
- Can I make these cookies ahead?
- Absolutely! Freeze unbaked stuffed cookie dough balls for up to 2 months, then bake from frozen—add 2–3 extra minutes to baking time.
Ingredients
- 2 ½ cups all-purpose flour
- ½ teaspoon baking powder
- ½ teaspoon salt
- 1 cup (2 sticks) unsalted butter, softened
- 1 cup granulated sugar
- 1 large egg
- 2 teaspoons vanilla extract
- ¼ cup strawberry jam (more as needed)
- 1 cup powdered sugar
- 2–3 tablespoons milk
- ½ teaspoon vanilla extract (for glaze)
- Pink or red food coloring (optional, for glaze)
- Sprinkles (for decorating)
Instructions
-
1In a medium bowl, whisk together flour, baking powder, and salt. Set aside.
-
2In a large bowl, cream the softened butter and granulated sugar with a hand mixer until light and fluffy, about 2–3 minutes.
-
3Beat in the egg and vanilla extract until fully combined.
-
4Gradually mix the dry ingredients into the wet, scraping the bowl, until a soft sugar cookie dough forms.
-
5Chill the dough in the refrigerator for 30 minutes for easier handling.
-
6Preheat your oven to 350°F (175°C). Line two baking sheets with parchment paper.
-
7Scoop out 2-tablespoon portions of dough and flatten each into a disc.
-
8Add 1 teaspoon of strawberry jam to the center of each disc. Fold and pinch the dough around the jam, then roll gently into a ball, sealing well.
-
9Place the balls on the baking sheet, leaving 2 inches between each, and gently flatten the tops.
-
10Bake for 11–13 minutes, or until the edges are just set and barely golden. The centers will look soft.
-
11Let cookies cool on the sheet for 5 minutes, then transfer to a wire rack to cool completely.
-
12In a small bowl, whisk powdered sugar, milk, vanilla extract, and food coloring (if using) until a smooth, pourable glaze forms.
-
13Spoon glaze over each cooled cookie, then immediately top with sprinkles. Let set 20–30 minutes.
Approximate Information for One Serving
Nutrition Disclaimers
Number of total servings shown is approximate. Actual number of servings will depend on your preferred portion sizes.
Nutritional values shown are general guidelines and reflect information for 1 serving using the ingredients listed, not including any optional ingredients. Actual macros may vary slightly depending on specific brands and types of ingredients used.
To determine the weight of one serving, prepare the recipe as instructed. Weigh the finished recipe, then divide the weight of the finished recipe (not including the weight of the container the food is in) by the desired number of servings. Result will be the weight of one serving.
Did you make this recipe?
Please consider Pinning it!

Leave a Reply