
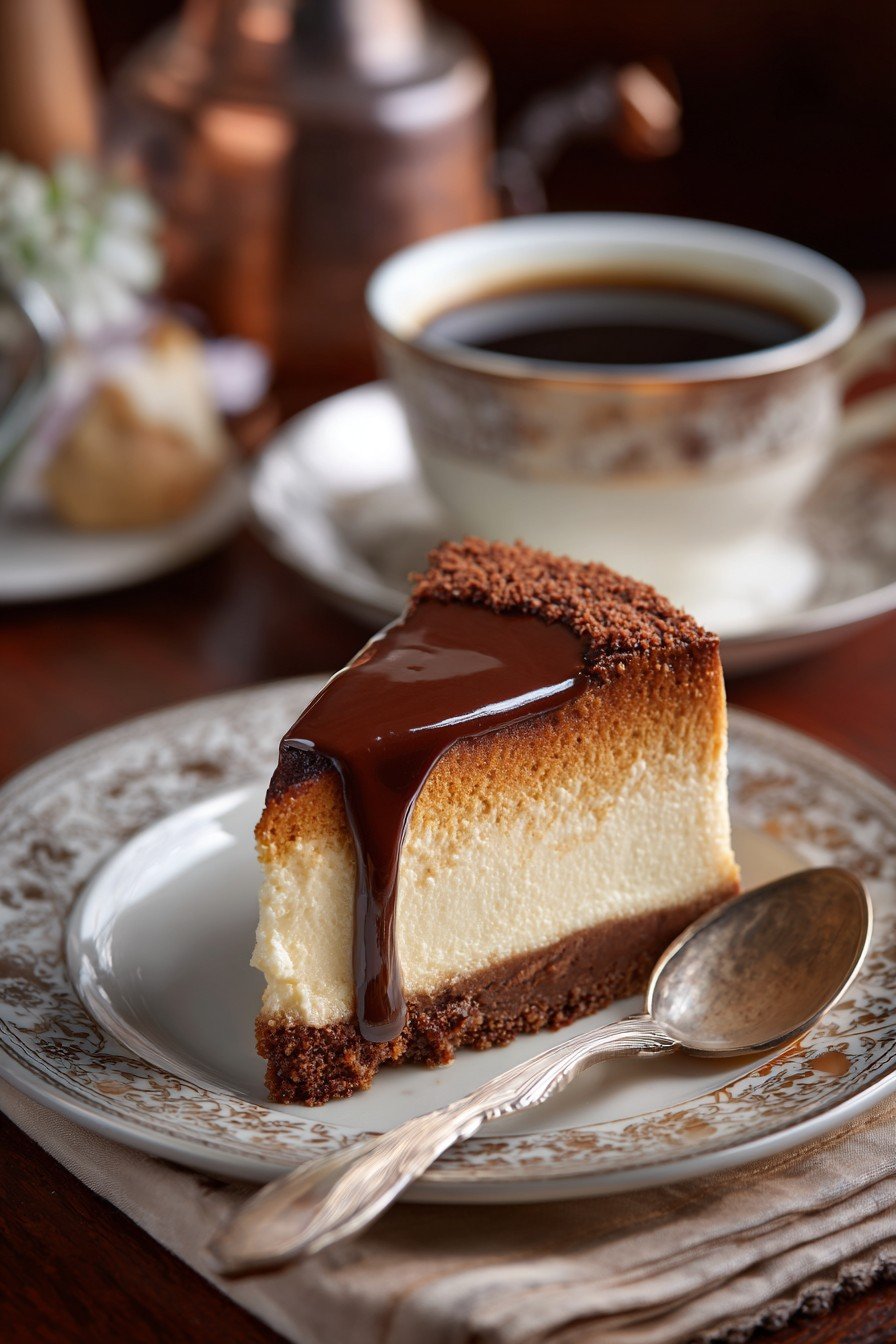
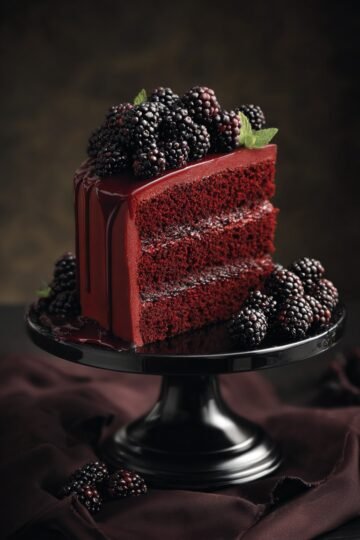
Hey y'all! If you love the bold, aromatic flavor of espresso and the creamy indulgence of cheesecake, you're in for a treat. This espresso coffee cheesecake combines velvety smoothness with a rich coffee kick that's irresistible for dessert lovers and coffee aficionados alike. It’s the ultimate centerpiece for your next gathering, cozy night in, or whenever you crave something special. Ready to impress your friends and delight your taste buds? Let’s get cooking!
Why You'll Love This Espresso Coffee Cheesecake
- Bursts with bold espresso flavor and luscious creamy texture in every bite.
- The chocolate cookie crust adds a delicious crunchy contrast.
- Perfect make-ahead dessert for parties or weeknight treats.
- Easy-to-follow steps make this recipe accessible even to baking newbies.
- Pairs perfectly with your favorite cup of coffee or after-dinner drink.
Ingredients
- 1 ½ cups chocolate cookie crumbs
- ¼ cup unsalted butter, melted
- 3 (8 oz) packages cream cheese, softened
- 1 cup granulated sugar
- 3 large eggs, room temperature
- ⅔ cup sour cream
- 3 tablespoons instant espresso powder
- 2 tablespoons hot water
- 1 teaspoon vanilla extract
- ½ teaspoon salt
- Optional: chocolate covered espresso beans or cocoa powder for garnish
Directions
Step 1: Prep and Make the Crust
- Preheat your oven to 325°F (163°C). Lightly grease a 9-inch springform pan.
- In a medium bowl, combine chocolate cookie crumbs and melted butter until mixture resembles wet sand.
- Press firmly into the bottom of the pan to form an even crust. Bake crust for 8 minutes, then let it cool slightly while preparing filling.
Step 2: Dissolve the Espresso
- In a small bowl, stir instant espresso powder into hot water until fully dissolved. Set aside to cool slightly.
Step 3: Make the Cheesecake Filling
- In a large mixing bowl, beat softened cream cheese with sugar until smooth and creamy (about 2-3 minutes).
- Beat in eggs one at a time, scraping down the bowl as needed.
- Mix in sour cream, dissolved espresso, vanilla extract, and salt. Beat until just combined and the mixture looks silky.
Step 4: Assemble and Bake
- Pour cheesecake batter over the cooled crust. Tap pan gently to release air bubbles.
- Bake in the center of the oven for 50-55 minutes, until edges are set and center jiggles slightly.
- Turn oven off, crack the door, and let cheesecake cool inside for 1 hour to prevent cracking.
Step 5: Chill and Serve
- Remove from oven and cool to room temperature. Cover and refrigerate for at least 4 hours (preferably overnight) to fully set.
- Run a knife around the edge before removing the springform ring. Garnish with chocolate covered espresso beans or a dusting of cocoa powder if desired.
Notes
- Always use full-fat cream cheese for best texture and flavor.
- Let all your dairy ingredients come to room temperature before mixing for super-smooth batter.
- If you notice cracks after baking, don't worry! A topping of whipped cream or chocolate drizzle can easily cover them.
Variations
- Mocha Swirl: Swirl in ¼ cup melted semisweet chocolate for a mocha twist.
- Lighter Version: Substitute Greek yogurt for the sour cream and reduced-fat cream cheese.
- Individual Mini Cheesecakes: Use a muffin tin lined with paper cups for single-serving cheesecakes (bake 20-25 minutes).
Required Equipment
- 9-inch springform pan
- Electric hand mixer or stand mixer
- Mixing bowls
- Rubber spatula
- Measuring cups and spoons
Storage Instructions
Store leftover espresso coffee cheesecake tightly covered in the refrigerator for up to 5 days. To freeze, wrap individual slices well and freeze for up to 2 months. Thaw overnight in the fridge before serving.
Serving Recommendations & Pairings
- Serve chilled with a dollop of freshly whipped cream or a sprinkle of dark cocoa powder.
- Garnish with chocolate covered espresso beans for an extra coffee punch.
- Pairs beautifully with a glass of dessert wine or a hot cup of espresso.
Pro Tips for Best Results
- Avoid over-mixing to keep the cheesecake texture smooth and prevent cracking.
- Bake in a water bath for even creamier results and fewer cracks.
- For clean slices, dip your knife in hot water and wipe between cuts.
Frequently Asked Questions
How strong is the coffee flavor in this cheesecake?
The espresso coffee cheesecake has a pronounced, yet balanced espresso flavor that enhances the creamy goodness without overwhelming the sweetness.
Can I use fresh brewed espresso instead of instant espresso powder?
Yes, you can substitute an equal amount of strong brewed espresso, but make sure it’s cooled and strain out any grounds for best texture.
Why does my cheesecake crack?
Cracks can happen from over-baking or rapid cooling; always cool the cheesecake gradually in the oven and avoid over-mixing the batter.
Prep time: 25 minutes
Cook time: 55 minutes
Total time: 5 hours 20 minutes (including chilling)
Ingredients
- 200g digestive biscuits, crushed
- 80g unsalted butter, melted
- 600g cream cheese, softened
- 180g granulated sugar
- 3 large eggs
- 150ml sour cream
- 2 tablespoon instant espresso powder
- 2 tablespoon hot water
- 1 teaspoon vanilla extract
Instructions
-
1Preheat the oven to 320°F (160°C). Grease a 9-inch (23 cm) springform pan and line the base with parchment paper.
-
2In a bowl, combine the crushed biscuits and melted butter. Press the mixture firmly into the base of the prepared pan to form the crust. Refrigerate while preparing the filling.
-
3Dissolve the instant espresso powder in hot water and set aside to cool.
-
4In a large mixing bowl, beat the cream cheese and sugar until smooth. Add eggs one at a time, mixing well after each. Beat in sour cream, vanilla extract, and the cooled espresso mixture until fully combined.
-
5Pour the filling over the crust and smooth the top. Bake for 50–55 minutes until the edges are set but the center is slightly wobbly. Turn off the oven, leave the cheesecake inside with the door ajar for 1 hour.
-
6Cool completely before refrigerating for at least 4 hours or overnight. Serve chilled, optionally topped with a coffee glaze or whipped cream.
Approximate Information for One Serving
Nutrition Disclaimers
Number of total servings shown is approximate. Actual number of servings will depend on your preferred portion sizes.
Nutritional values shown are general guidelines and reflect information for 1 serving using the ingredients listed, not including any optional ingredients. Actual macros may vary slightly depending on specific brands and types of ingredients used.
To determine the weight of one serving, prepare the recipe as instructed. Weigh the finished recipe, then divide the weight of the finished recipe (not including the weight of the container the food is in) by the desired number of servings. Result will be the weight of one serving.
Did you make this recipe?
Please consider Pinning it!!
Leave a Reply