
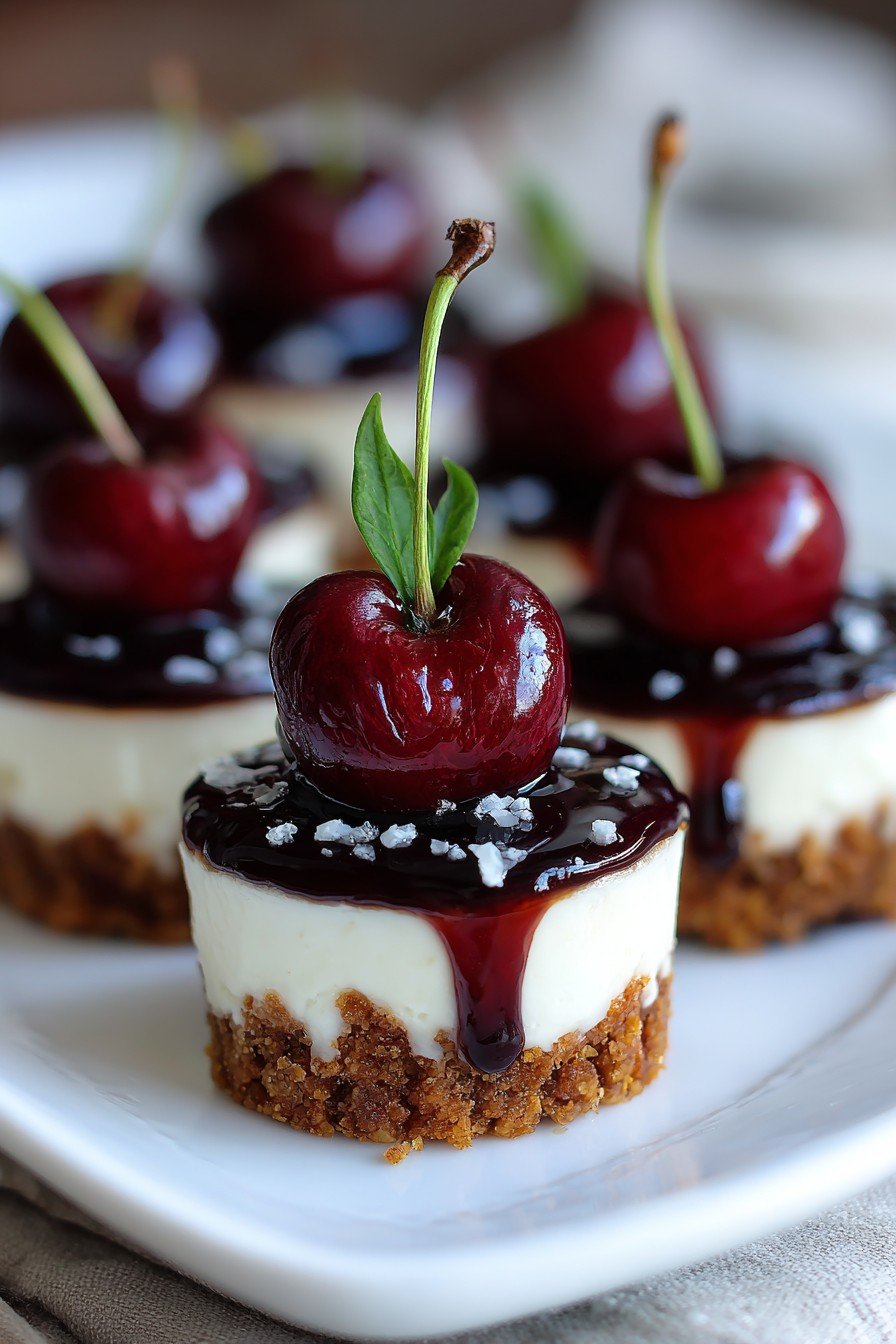
Hey y'all! If you love a bite-sized, creamy treat that's bursting with tangy sweetness, look no further than these Cherry Cheesecake Bites. Each mini cheesecake is loaded with rich cream cheese goodness and topped with a glistening cherry, making them irresistible for potlucks, dessert tables, or anytime snacking. They're super simple, quick to make, and guaranteed to disappear fast. Let's get cooking!
Why You'll Love This
- Perfectly portioned, so no slicing and serving fuss—just grab and go!
- Creamy, tangy cheesecake filling contrasted by a sweet-tart cherry topping.
- Quick prep and baking time means dessert is ready in under an hour.
- Totally customizable with different crusts or toppings.
- Great make-ahead dessert for parties, holidays, or weekday cravings!
Ingredients
- 1 cup graham cracker crumbs
- 3 tablespoons granulated sugar (for crust)
- 4 tablespoons unsalted butter, melted
- 8 ounces cream cheese, softened
- ⅓ cup granulated sugar (for filling)
- 1 large egg, room temperature
- 1 teaspoon pure vanilla extract
- ½ teaspoon lemon juice
- ½ cup sour cream
- 1 can (21 ounces) cherry pie filling
Directions
Prep Time: 20 minutes | Cook Time: 18 minutes | Total Time: 38 minutes | Yields: 16 bites
1. Prepare Muffin Pan
- Preheat oven to 325°F (163°C). Line a mini muffin pan with 16 paper liners.
2. Make the Crust
- In a bowl, mix graham cracker crumbs, 3 tablespoons sugar, and melted butter until well combined and sandy.
- Divide the mixture evenly into each liner (about 1 heaping teaspoon per cup). Press firmly with the back of a spoon to create a flat crust.
3. Mix the Cheesecake Filling
- In a medium bowl, beat the softened cream cheese and ⅓ cup sugar with an electric mixer until smooth and fluffy.
- Beat in the egg just until combined. Add vanilla extract, lemon juice, and sour cream. Mix until silky and lump-free.
4. Fill and Bake
- Spoon the cheesecake filling evenly over the crusts, filling each cup nearly to the top.
- Bake on the middle rack for 16–18 minutes or until centers are set but still a little jiggly.
- Cool in pan for 10 minutes, then transfer bites to a wire rack to cool to room temperature.
5. Add Cherry Topping
- Once completely cool, top each cheesecake bite with a spoonful of cherry pie filling. Chill in the refrigerator for at least 1 hour before serving.
Notes
- Soften cream cheese fully at room temperature for smooth, lump-free batter.
- If you want crispier crusts, prebake them for 3–4 minutes before adding filling.
- For neater edges, use a piping bag or zip-top bag to fill the cups with cheesecake mixture.
Variations
- Swap graham crackers for crushed vanilla wafers or chocolate cookies for a different crust.
- Top with blueberry or strawberry pie filling instead of cherry.
- Add a swirl of melted dark chocolate before chilling.
Required Equipment
- Mini muffin pan (16-cup)
- Paper liners
- Electric mixer (hand or stand mixer)
- Mixing bowls
- Measuring spoons and cups
- Small spoon
Storage Instructions
- Store leftover Cherry Cheesecake Bites in an airtight container in the refrigerator for up to 4 days.
- They can be frozen (without cherry topping) for up to 2 months; thaw overnight in the fridge, then add topping before serving.
Serving Suggestions
- Pair these bites with a hot cup of coffee or a glass of sparkling wine.
- Arrange on a colorful dessert platter for parties.
- Add fresh mint leaves for a pop of color and extra freshness.
Pro Tips
- Don’t overbake—the centers should jiggle slightly for extra-creamy texture.
- Chill thoroughly for the best flavor and easiest bite.
- Lift out of the muffin tin gently using the paper liners.
FAQ
Can I use homemade cherry topping?
Absolutely! Feel free to cook up a quick cherry compote for an even fruitier finish.
What if I don't have a mini muffin pan?
You can make regular muffin-size cheesecake bites—bake for 22–24 minutes and yield will be about 7–8 larger bites.
Do I need to use paper liners?
Liners make removal super easy, but you can also grease the pan well and run a thin knife around the edges to release.
Ingredients
- 1 cup graham cracker crumbs
- 3 tablespoons granulated sugar (for crust)
- 4 tablespoons unsalted butter, melted
- 8 ounces cream cheese, softened
- ⅓ cup granulated sugar (for filling)
- 1 large egg, room temperature
- 1 teaspoon pure vanilla extract
- ½ teaspoon lemon juice
- ½ cup sour cream
- 1 can (21 ounces) cherry pie filling
Instructions
-
1Preheat oven to 325°F (163°C). Line a mini muffin pan with 16 paper liners.
-
2In a bowl, mix graham cracker crumbs, 3 tablespoons sugar, and melted butter until well combined and sandy.
-
3Divide the mixture evenly into each liner (about 1 heaping teaspoon per cup). Press firmly with the back of a spoon to create a flat crust.
-
4In a medium bowl, beat the softened cream cheese and ⅓ cup sugar with an electric mixer until smooth and fluffy.
-
5Beat in the egg just until combined. Add vanilla extract, lemon juice, and sour cream. Mix until silky and lump-free.
-
6Spoon the cheesecake filling evenly over the crusts, filling each cup nearly to the top.
-
7Bake on the middle rack for 16–18 minutes or until centers are set but still a little jiggly.
-
8Cool in pan for 10 minutes, then transfer bites to a wire rack to cool to room temperature.
-
9Once completely cool, top each cheesecake bite with a spoonful of cherry pie filling. Chill in the refrigerator for at least 1 hour before serving.
Approximate Information for One Serving
Nutrition Disclaimers
Number of total servings shown is approximate. Actual number of servings will depend on your preferred portion sizes.
Nutritional values shown are general guidelines and reflect information for 1 serving using the ingredients listed, not including any optional ingredients. Actual macros may vary slightly depending on specific brands and types of ingredients used.
To determine the weight of one serving, prepare the recipe as instructed. Weigh the finished recipe, then divide the weight of the finished recipe (not including the weight of the container the food is in) by the desired number of servings. Result will be the weight of one serving.
Did you make this recipe?
Please consider Pinning it!

Leave a Reply