
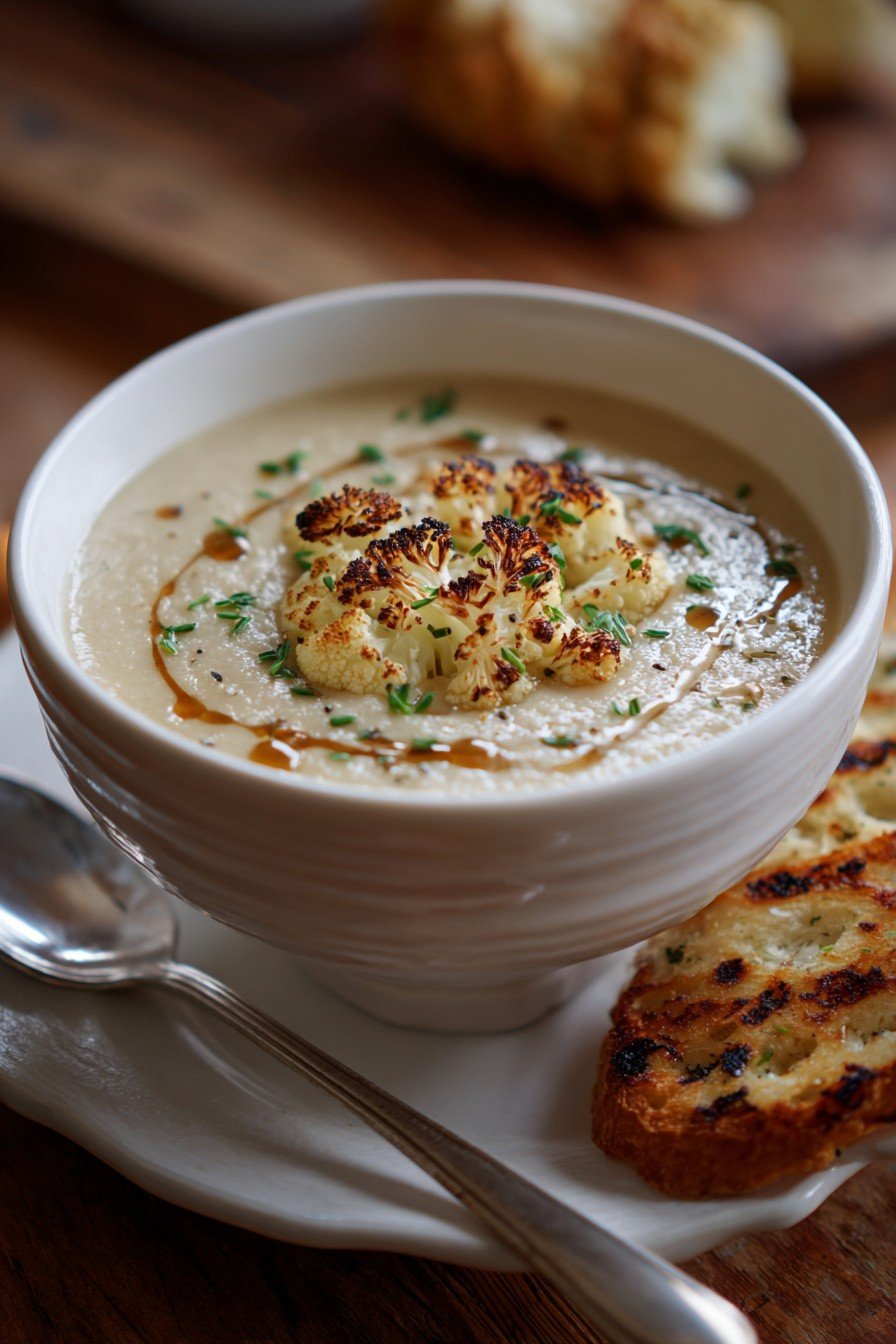
Hey y'all! If you're craving a cozy, velvety soup that checks all the boxes for comfort, flavor, and nutrition, this Creamy Roasted Cauliflower soup is about to become your new favorite. Each spoonful delivers a luscious blend of sweet, caramelized roasted cauliflower mingled with herbs and a savory richness. It's perfect for chilly nights, light lunches, or impressing dinner guests. Let's get cooking!
Why You'll Love This Creamy Roasted Cauliflower Soup
- Ultra-creamy texture without any heavy cream — pure veggie magic!
- Roasting adds rich, caramelized notes for seriously bold flavor.
- Easy, wholesome ingredients you can find at any grocery store.
- Meal-prep friendly, freezer-safe, and perfect for make-ahead lunches.
- Customizable with your favorite toppings and flavors.
Ingredients
- 1 large head cauliflower (about 2 lbs), cut into florets
- 2 tablespoons olive oil (plus extra for drizzling)
- 1 medium yellow onion, diced
- 3 cloves garlic, minced
- 1 teaspoon kosher salt
- ½ teaspoon ground black pepper
- ½ teaspoon smoked paprika (optional, for depth)
- 4 cups vegetable broth (or chicken broth)
- 1 cup unsweetened canned coconut milk or heavy cream
- 1 tablespoon fresh lemon juice
- Chopped parsley, chives, or crispy chickpeas for garnish (optional)
How to Make Creamy Roasted Cauliflower Soup
Step 1: Roast the Cauliflower
- Preheat your oven to 425°F (220°C). Line a large baking sheet with parchment paper.
- Toss cauliflower florets with 1 ½ tablespoons olive oil, ½ teaspoon salt, and ¼ teaspoon pepper. Spread in an even layer on the prepared sheet.
- Roast for 25–30 minutes, turning halfway, until cauliflower is deeply golden and tender.
Step 2: Sauté Aromatics
- In a large pot, heat ½ tablespoon olive oil over medium heat. Add diced onion and cook for 4–5 minutes until soft and translucent.
- Add minced garlic and cook for 1 more minute until fragrant.
- Add the smoked paprika (if using) and stir.
Step 3: Simmer the Soup
- Add roasted cauliflower to the pot, pour in vegetable broth, and bring to a simmer. Let simmer uncovered for 10 minutes to blend flavors.
Step 4: Blend for Creaminess
- Using an immersion blender, purée the soup until perfectly smooth. Alternatively, blend in batches in a blender (carefully, as it’s hot), returning soup to the pot.
Step 5: Finish and Serve
- Stir in coconut milk or heavy cream and lemon juice. Taste and adjust seasonings (add more salt, pepper, or lemon juice as needed).
- Ladle into bowls and garnish with fresh herbs, a drizzle of olive oil, or crispy toppings. Enjoy!
- Prep Time: 10 minutes
- Cook Time: 40 minutes
- Total Time: 50 minutes
Notes
- For ultra-smooth soup, blend in batches in a high-powered blender.
- If the soup is too thick, add extra broth or water to thin it out before serving.
- Roasting cauliflower until deep golden brown intensifies its flavor—don't be afraid of a little color!
Variations
- Cheesy Cauliflower Soup: Stir in 1 cup grated sharp cheddar cheese after blending.
- Spiced Curry Version: Add 2 teaspoons curry powder with the onion and garlic.
- Low-carb Loaded Soup: Top with crispy bacon bits, shredded cheese, and sliced green onions.
Required Equipment
- Large baking sheet
- Large soup pot
- Immersion blender or high-power blender
- Chef’s knife & cutting board
- Ladle
Storage and Shelf Life
Let the soup cool completely, then transfer to airtight containers. Store in the refrigerator for up to 4 days. For longer storage, freeze portions for up to 3 months; thaw overnight in the fridge and reheat gently on the stove, adding a splash of broth or water if needed.
Serving Suggestions
- Pair with a thick slice of rustic bread or toasted garlic baguette for dunking.
- Serve alongside a crisp green salad for a light lunch.
- Top with roasted chickpeas or crunchy croutons for extra texture.
Pro Tips
- Roast the cauliflower until golden brown for the most flavorful soup base.
- Always blend in batches if using a stand blender to avoid hot splatters.
- Brighten the finished soup with a squeeze of fresh lemon juice just before serving.
FAQ
Can I make this soup vegan?
Absolutely! Just use coconut milk or any plant-based cream and ensure your broth is vegetable-based.
Can I freeze Creamy Roasted Cauliflower Soup?
Yes, this soup freezes beautifully. Let it cool fully, portion into freezer-safe containers, and freeze for up to 3 months. Thaw and reheat gently before enjoying.
What other veggies can I add?
You can add roasted carrots, parsnips, or even a potato for extra body and sweetness.
Ingredients
- 1 large head cauliflower, cut into florets
- 2 tablespoons olive oil
- 1 medium yellow onion, chopped
- 2 cloves garlic, minced
- 3 cups vegetable broth
- 1 cup whole milk or heavy cream
- ½ teaspoon salt
- ¼ teaspoon black pepper
- Fresh chives, chopped (optional, for garnish)
Instructions
-
1Preheat the oven to 425°F (220°C). Toss the cauliflower florets with 1 tablespoon olive oil, salt, and pepper on a baking sheet.
-
2Roast the cauliflower for 25-30 minutes, flipping halfway through, until golden brown and tender.
-
3While the cauliflower roasts, heat the remaining olive oil in a large pot over medium heat. Add the onion and cook for 4-5 minutes, until translucent. Add the garlic and cook for 1 minute more.
-
4Add the roasted cauliflower to the pot with the vegetable broth. Bring to a simmer and cook for 5 minutes.
-
5Use an immersion blender or regular blender to blend the soup until smooth. Stir in the milk or cream. Simmer for 2-3 minutes to warm through. Adjust seasoning as desired.
-
6Serve hot, garnished with chopped chives if desired.
Approximate Information for One Serving
Nutrition Disclaimers
Number of total servings shown is approximate. Actual number of servings will depend on your preferred portion sizes.
Nutritional values shown are general guidelines and reflect information for 1 serving using the ingredients listed, not including any optional ingredients. Actual macros may vary slightly depending on specific brands and types of ingredients used.
To determine the weight of one serving, prepare the recipe as instructed. Weigh the finished recipe, then divide the weight of the finished recipe (not including the weight of the container the food is in) by the desired number of servings. Result will be the weight of one serving.
Did you make this recipe?
Please consider Pinning it!!


Leave a Reply