
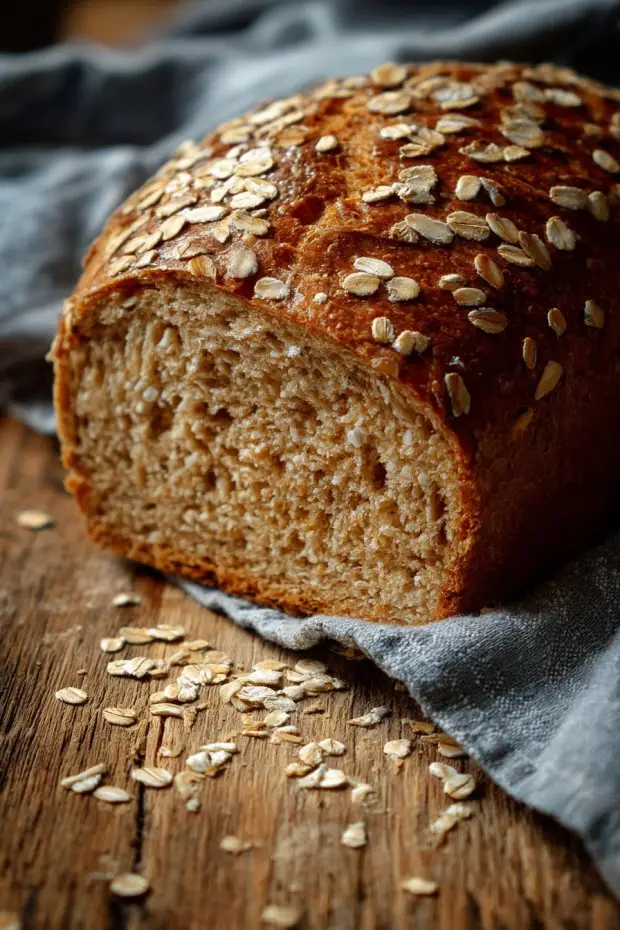
Hey y’all! If you’re ready for a bakery-worthy loaf straight from your oven, this Homemade Honey Oat Bread is guaranteed to win you over. This bread is ultra-soft, slightly sweet, and boasts a hearty texture thanks to wholesome oats. Perfect for breakfast toast, sandwiches, or simply as a comforting snack with a dab of butter. Let’s get baking!
Why You'll Love This Homemade Honey Oat Bread
- Easy, no-fuss recipe perfect for beginner bakers, yet impressive enough for seasoned pros.
- Lightly sweetened with honey for a rich, nuanced flavor.
- Hearty oats give the bread amazing texture and extra nutrition.
- Makes your kitchen smell absolutely wonderful while baking.
- Stays soft for days—great for meal prep!
Ingredients
- 2 ¼ teaspoons (1 packet) active dry yeast
- 1 cup warm water (110°F/43°C)
- 2 tablespoons unsalted butter, melted
- ¼ cup honey
- 2 ½ cups bread flour
- 1 cup old-fashioned rolled oats (plus extra for topping)
- 1 teaspoon salt
- ½ cup milk, at room temperature
- 1 egg, lightly beaten (optional, for egg wash)
Directions
Step 1: Activate the Yeast
In a large mixing bowl, dissolve 2 ¼ teaspoons active dry yeast in 1 cup warm water (110°F/43°C). Let it stand for 5-10 minutes, until foamy.
Step 2: Combine Wet Ingredients
Stir in 2 tablespoons melted unsalted butter, ¼ cup honey, and ½ cup milk to the yeast mixture until well combined.
Step 3: Add Dry Ingredients
Add 2 ½ cups bread flour, 1 cup old-fashioned rolled oats, and 1 teaspoon salt. Stir until a shaggy dough forms.
Step 4: Knead the Dough
Knead the dough on a lightly floured surface for 8 minutes (or use a stand mixer with dough hook for 6 minutes) until the dough is smooth and elastic.
Step 5: First Rise
Place the dough in a greased bowl, cover with plastic wrap or a damp towel, and let rise in a warm area until doubled, about 1 hour.
Step 6: Shape and Second Rise
Punch down the dough, shape into a log, and place into a greased 9×5-inch loaf pan. Cover and let rise for 30–40 minutes, until noticeably puffy.
Step 7: Preheat and Prepare for Baking
Preheat oven to 350°F (175°C). If desired, brush the top with a beaten egg and sprinkle with extra oats for a rustic finish.
Step 8: Bake
Bake for 35–40 minutes, until golden and the loaf sounds hollow when tapped. Tent loosely with foil if the top is browning too quickly.
Step 9: Cool and Serve
Let the bread cool in the pan for 10 minutes, then remove to a wire rack to cool completely before slicing.
Notes
- Make sure your water isn’t too hot or it may kill the yeast—stick to 110°F/43°C.
- If using instant yeast, you can skip the proofing step and mix it directly with flour.
- This bread makes amazing French toast if slightly stale!
Variations
- Add ½ cup chopped nuts or seeds for extra crunch and nutrition.
- Mix in ¼ cup dried cranberries or raisins for a naturally sweet twist.
- Replace half the bread flour with whole wheat flour for a heartier loaf.
Required Equipment
- Large mixing bowl
- Measuring cups and spoons
- Wooden spoon or stand mixer with dough hook
- 9×5-inch loaf pan
- Plastic wrap or kitchen towel
- Wire cooling rack
Storage Instructions
Wrap cooled bread tightly in plastic wrap or store in an airtight container at room temperature for up to 4 days. For longer storage, slice and freeze for up to 2 months; simply thaw or toast slices as needed.
Suggested Pairings & Serving Recommendations
- Serve warm with butter and a drizzle of honey for breakfast.
- Makes a wonderful base for turkey or chicken sandwiches.
- Try toasting and topping with avocado or nut butter for a wholesome snack.
Pro Tips
- For a lighter loaf, don’t over-flour the dough—it should be slightly tacky but not sticky.
- Let the bread cool completely before slicing for the neatest slices and best texture.
- If your house runs cool, stick the dough in a turned-off oven with the light on to help it rise faster.
FAQ
Can I make this bread dairy-free?
Yes, substitute almond milk or oat milk for regular milk and use a dairy-free butter alternative.
Why did my bread turn out dense?
This usually happens if the dough is over-floured or not kneaded long enough. Also, make sure your yeast is fresh and active.
Can I double this recipe?
Absolutely! Double all ingredients and divide between two loaf pans for two beautiful loaves.
Prep Time:
20 minutes
Total Time:
2 hours 15 minutes
Ingredients
- 2 ¼ teaspoons (1 packet) active dry yeast
- 1 cup warm water (110°F/43°C)
- 2 tablespoons unsalted butter, melted
- ¼ cup honey
- 2 ½ cups bread flour
- 1 cup old-fashioned rolled oats (plus extra for topping)
- 1 teaspoon salt
- ½ cup milk, at room temperature
- 1 egg, lightly beaten (optional, for egg wash)
Instructions
-
1In a large mixing bowl, dissolve 2 ¼ teaspoons active dry yeast in 1 cup warm water (110°F/43°C). Let it stand for 5-10 minutes, until foamy.
-
2Stir in 2 tablespoons melted unsalted butter, ¼ cup honey, and ½ cup milk to the yeast mixture until well combined.
-
3Add 2 ½ cups bread flour, 1 cup old-fashioned rolled oats, and 1 teaspoon salt. Stir until a shaggy dough forms.
-
4Knead the dough on a lightly floured surface for 8 minutes (or use a stand mixer with dough hook for 6 minutes) until the dough is smooth and elastic.
-
5Place the dough in a greased bowl, cover with plastic wrap or a damp towel, and let rise in a warm area until doubled, about 1 hour.
-
6Punch down the dough, shape into a log, and place into a greased 9×5-inch loaf pan. Cover and let rise for 30–40 minutes, until noticeably puffy.
-
7Preheat oven to 350°F (175°C). If desired, brush the top with a beaten egg and sprinkle with extra oats for a rustic finish.
-
8Bake for 35–40 minutes, until golden and the loaf sounds hollow when tapped. Tent loosely with foil if the top is browning too quickly.
-
9Let the bread cool in the pan for 10 minutes, then remove to a wire rack to cool completely before slicing.
Approximate Information for One Serving
Nutrition Disclaimers
Number of total servings shown is approximate. Actual number of servings will depend on your preferred portion sizes.
Nutritional values shown are general guidelines and reflect information for 1 serving using the ingredients listed, not including any optional ingredients. Actual macros may vary slightly depending on specific brands and types of ingredients used.
To determine the weight of one serving, prepare the recipe as instructed. Weigh the finished recipe, then divide the weight of the finished recipe (not including the weight of the container the food is in) by the desired number of servings. Result will be the weight of one serving.
Did you make this recipe?
Please consider Pinning it!

Leave a Reply