
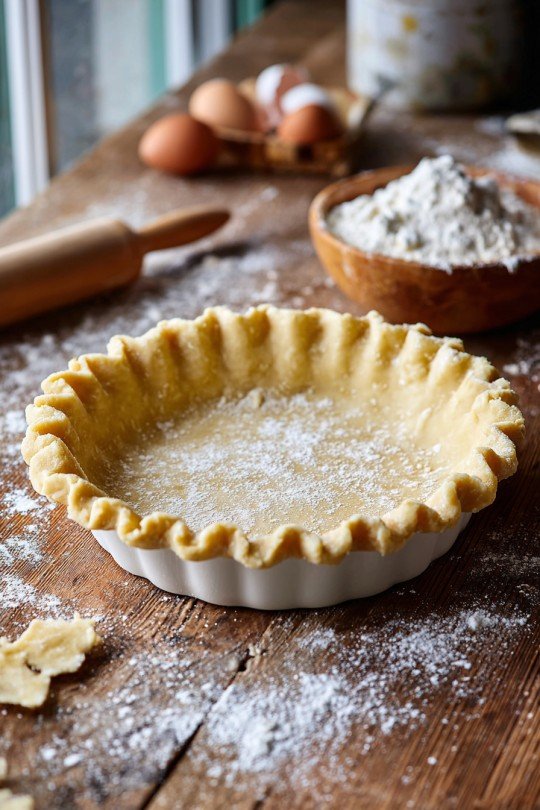
Hey y'all! There's nothing quite like the taste of a perfectly golden, flaky pie crust made from scratch. This classic homemade pie crust is your ticket to impressing the whole family, whether you're whipping up a fruit pie for summer gatherings or a savory pot pie for cozy nights in. With its irresistibly buttery layers and crisp texture, this crust is a true crowd-pleaser. Let's get cooking!
Why You'll Love This
- Super flaky and tender texture that melts in your mouth.
- Simple and versatile – use it for sweet or savory pies.
- Made with everyday ingredients you likely already have.
- Quick to prepare – just 15 minutes of hands-on time.
- Perfect for both beginner and experienced bakers.
Ingredients
- 2 ½ cups (312 g) all-purpose flour
- 1 cup (226 g) unsalted butter, cold and cut into cubes
- 1 teaspoon salt
- 1 tablespoon granulated sugar
- 6-8 tablespoons (90-120 ml) ice water
Directions
- Prepare Dry Ingredients: In a large mixing bowl, whisk together the flour, salt, and sugar until evenly combined.
- Cut in Butter: Add the cold, cubed butter. With a pastry cutter or your fingertips, blend until the mixture resembles coarse crumbs with some pea-sized pieces of butter remaining.
- Add Ice Water: Drizzle in 6 tablespoons of ice water, stirring gently with a fork. Add more ice water, 1 tablespoon at a time, just until the dough begins to come together and holds when pressed.
- Form the Dough: Turn the dough out onto a lightly floured surface. Gently knead a few times, then divide into two equal portions and shape each into a disk. Wrap tightly in plastic wrap.
- Chill the Dough: Refrigerate both disks for at least 1 hour, or up to 2 days. This chilling time helps ensure maximum flakiness.
- Roll and Shape: Remove one disk from the fridge and let it rest for 5 minutes. On a floured surface, roll out the dough into a 12-inch circle, about ⅛-inch thick. Carefully transfer to your pie dish.
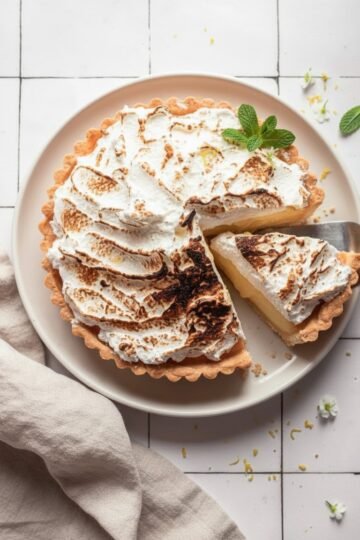
- Fill and Bake: Add your pie filling (sweet or savory), top with the second rolled crust (if needed), and trim and crimp the edges. For a standard pie, bake at 425°F (220°C) for 20 minutes, then reduce to 375°F (190°C) and continue baking per your specific pie recipe (usually 30-40 minutes more), until the crust is golden and filling is bubbling.
Notes
- Keep all ingredients – especially the butter and water – as cold as possible for the flakiest texture.
- Don't overwork the dough to avoid a tough crust.
- Use a pie shield or foil on the edges if they're browning too quickly.
Variations
- Whole Wheat Pie Crust: Swap half of the all-purpose flour for whole wheat flour for a nutty flavor and more fiber.
- Gluten-Free Pie Crust: Substitute a 1:1 gluten-free baking flour blend for regular flour.
- Dairy-Free Pie Crust: Replace butter with equal parts cold vegetable shortening.
Required Equipment
- Large mixing bowl
- Pastry cutter or fork
- Rolling pin
- Plastic wrap
- Pie dish (9-inch recommended)
- Measuring cups and spoons
Storage Instructions
- Unbaked Dough: Store wrapped in plastic in the fridge for up to 2 days or freeze for up to 3 months. Thaw overnight in the fridge before using.
- Baked Pie: Store covered at room temperature for up to 2 days or in the fridge for up to 5 days. For longer storage, wrap slices and freeze up to 2 months.
Suggested Pairings & Serving Recommendations
- Fill with apple, cherry, or pumpkin for classic dessert pies.
- Use for hearty quiches or savory pot pies.
- Serve warm with a scoop of vanilla ice cream or whipped cream for an extra treat.
Pro Tips
- Chill your rolling pin and pie dish for even more flake.
- Use vodka in place of half the water for ultra-tender dough—it evaporates during baking.
- If dough cracks while rolling, gently patch with a bit of extra dough and cold water.
FAQ
- What if my dough is too dry? Add extra ice water, one teaspoon at a time, until it comes together.
- Can I make the dough ahead of time? Absolutely—pie crust dough can be kept in the fridge for 2 days or frozen for 3 months.
- Why does my crust shrink? Overworking the dough or not chilling long enough can cause shrinkage, so handle gently and give plenty of chill time.
Prep Time: 15 minutes
Chill Time: 1 hour
Total Time: 1 hour 15 minutes plus baking time
Ingredients
- 2 ½ cups (312 g) all-purpose flour
- 1 cup (226 g) unsalted butter, cold and cut into cubes
- 1 teaspoon salt
- 1 tablespoon granulated sugar
- 6-8 tablespoons (90-120 ml) ice water
Instructions
-
1Prepare Dry Ingredients: In a large mixing bowl, whisk together the flour, salt, and sugar until evenly combined.
-
2Cut in Butter: Add the cold, cubed butter. With a pastry cutter or your fingertips, blend until the mixture resembles coarse crumbs with some pea-sized pieces of butter remaining.
-
3Add Ice Water: Drizzle in 6 tablespoons of ice water, stirring gently with a fork. Add more ice water, 1 tablespoon at a time, just until the dough begins to come together and holds when pressed.
-
4Form the Dough: Turn the dough out onto a lightly floured surface. Gently knead a few times, then divide into two equal portions and shape each into a disk. Wrap tightly in plastic wrap.
-
5Chill the Dough: Refrigerate both disks for at least 1 hour, or up to 2 days. This chilling time helps ensure maximum flakiness.
-
6Roll and Shape: Remove one disk from the fridge and let it rest for 5 minutes. On a floured surface, roll out the dough into a 12-inch circle, about ⅛-inch thick. Carefully transfer to your pie dish.
-
7Fill and Bake: Add your pie filling (sweet or savory), top with the second rolled crust (if needed), and trim and crimp the edges. For a standard pie, bake at 425°F (220°C) for 20 minutes, then reduce to 375°F (190°C) and continue baking per your specific pie recipe (usually 30-40 minutes more), until the crust is golden and filling is bubbling.
Approximate Information for One Serving
Nutrition Disclaimers
Number of total servings shown is approximate. Actual number of servings will depend on your preferred portion sizes.
Nutritional values shown are general guidelines and reflect information for 1 serving using the ingredients listed, not including any optional ingredients. Actual macros may vary slightly depending on specific brands and types of ingredients used.
To determine the weight of one serving, prepare the recipe as instructed. Weigh the finished recipe, then divide the weight of the finished recipe (not including the weight of the container the food is in) by the desired number of servings. Result will be the weight of one serving.
Did you make this recipe?
Please consider Pinning it!


Leave a Reply