
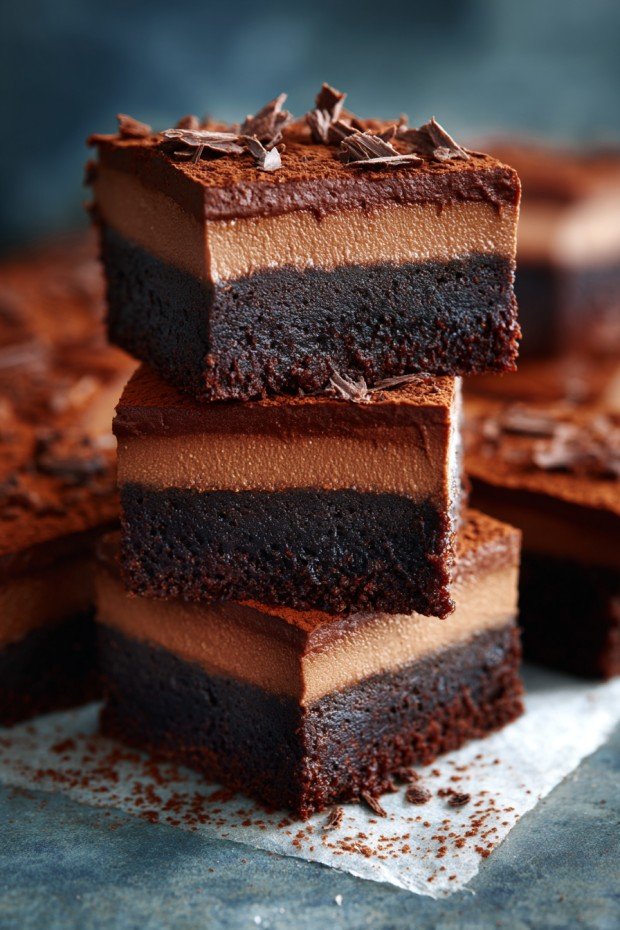
Hey y'all! If you're craving a truly rich and scrumptious dessert, these Chocolate Mousse Brownies are about to become your new favorite treat. They combine a fudgy, chocolatey base with a silky, cloud-like mousse topping, creating the ultimate indulgence perfect for birthdays, holiday celebrations, or whenever you need a Chocolate fix. Ready to wow your family and friends (or just treat yourself)? Let’s get cooking!
Why You'll Love This
- Double the chocolate in one decadent treat.
- Perfectly balanced contrast between fudgy brownie and airy mousse.
- Easy to prep ahead—ideal for parties or make-ahead desserts.
- Customizable with endless flavor variations.
- Guaranteed crowd-pleaser every time!
Ingredients
For the Brownie Layer:
- ½ cup (115g) unsalted butter, melted
- 1 cup (200g) granulated sugar
- 2 large eggs
- 1 teaspoon vanilla extract
- ⅓ cup (40g) unsweetened cocoa powder
- ½ cup (65g) all-purpose flour
- ¼ teaspoon salt
- ¼ teaspoon baking powder
For the Chocolate Mousse Layer:
- 3 oz (85g) semi-sweet chocolate, chopped
- 1 cup (240ml) heavy whipping cream, divided
- 2 tablespoon (15g) powdered sugar
- ½ teaspoon vanilla extract
Directions
Prep Time:
- 20 minutes
Cook Time:
- 25 minutes
Total Time:
- 2 hours (includes chilling time)
1. Make the Brownie Base
- Preheat your oven to 350°F (175°C). Grease and line an 8x8-inch (20x20 cm) baking pan with parchment paper.
- In a medium bowl, whisk together melted butter and sugar until smooth.
- Add eggs and vanilla extract, whisking until well combined and glossy.
- Sift in the cocoa powder, flour, salt, and baking powder. Stir gently until no streaks remain—don’t overmix.
- Pour batter into prepared pan and spread evenly.
- Bake for 22-25 minutes, or until a toothpick inserted into the center comes out with just a few moist crumbs.
- Cool completely in the pan on a rack.
2. Prepare the Chocolate Mousse
- Melt the chopped chocolate with ¼ cup (60ml) heavy cream in a microwave-safe bowl in 20-second intervals, stirring between each, until smooth. Let cool to room temperature.
- In a separate bowl, whip the remaining ¾ cup (180ml) heavy cream, powdered sugar, and vanilla extract to soft peaks.
- Gently fold the cooled, melted chocolate into the whipped cream in two additions until fully combined and luscious.
3. Assemble & Chill
- Once brownies are completely cool, spread the chocolate mousse evenly over the brownie layer.
- Refrigerate for at least 1 hour (preferably 2) to set the mousse.
- Slice, serve chilled, and enjoy!
Notes
- Let the brownies cool fully to prevent the mousse from melting or sliding.
- Use high-quality chocolate for the mousse—your taste buds will thank you.
- Line your pan with parchment for easy brownie removal and neat edges.
Variations
- Mocha Mousse Brownies: Add 1 teaspoon espresso powder to the mousse for a coffee kick.
- Nutty Chocolate Mousse Brownies: Fold in ½ cup of chopped walnuts or pecans to the brownie batter.
- White Chocolate Mousse: Swap semi-sweet for white chocolate for a creamy twist.
Required Equipment
- 8x8-inch baking pan
- Parchment paper
- Mixing bowls
- Whisk and spatula
- Electric mixer or hand whisk
- Microwave or double boiler
Storage Instructions
Keep leftover Chocolate Mousse Brownies in an airtight container in the refrigerator for up to 4 days. For best texture, let them sit at room temperature for 10 minutes before serving. They do not freeze well, as the mousse can lose its creaminess when thawed.
Suggested Pairings & Serving Recommendations
- Serve with fresh berries, like raspberries or strawberries, for a pop of tartness.
- Add a dollop of whipped cream or a scoop of vanilla ice cream for extra indulgence.
- Pair with a glass of cold milk, dark coffee, or dessert wine.
Pro Tips
- For clean brownie slices, use a sharp knife dipped in hot water and wiped dry between cuts.
- Double the recipe and use a 9x13-inch pan for even more servings at parties.
- Chill assembled brownies thoroughly so the mousse sets up perfectly before slicing.
Frequently Asked Questions (FAQ)
Can I use store-bought brownie mix?
Absolutely! For an even quicker version, bake your favorite box brownies and let cool before adding the mousse layer.
Can I make these ahead of time?
Yes! Chocolate Mousse Brownies are best made up to 1 day in advance and kept covered in the fridge until ready to serve.
How do I know the brownie layer is done baking?
The brownies are ready when a toothpick inserted into the center comes out with a few moist crumbs—don’t wait for it to come out clean, or they could end up dry.
Ingredients
- 1 cup (175g) semi-sweet chocolate chips
- ½ cup (115g) unsalted butter
- ¾ cup (150g) granulated sugar
- 2 large eggs
- 1 teaspoon vanilla extract
- ¾ cup (90g) all-purpose flour
- ¼ teaspoon salt
- 1 cup (240ml) heavy whipping cream
- ½ cup (85g) dark chocolate, chopped
- 2 tablespoons powdered sugar
Instructions
-
1Preheat oven to 350°F (175°C). Line an 8x8-inch square baking pan with parchment paper.
-
2In a microwave-safe bowl, melt the chocolate chips and butter together. Stir until smooth and let cool slightly.
-
3Whisk in the sugar, eggs, and vanilla extract until well combined. Add flour and salt, stirring until just incorporated.
-
4Pour the brownie batter into the prepared pan and bake for 22-25 minutes or until set. Cool completely.
-
5For the mousse, melt dark chocolate and let cool for 5 minutes. Whip heavy cream and powdered sugar until stiff peaks form, then gently fold in melted chocolate until smooth.
-
6Spread chocolate mousse over cooled brownies. Chill in the fridge for at least 1 hour before slicing and serving.
Approximate Information for One Serving
Nutrition Disclaimers
Number of total servings shown is approximate. Actual number of servings will depend on your preferred portion sizes.
Nutritional values shown are general guidelines and reflect information for 1 serving using the ingredients listed, not including any optional ingredients. Actual macros may vary slightly depending on specific brands and types of ingredients used.
To determine the weight of one serving, prepare the recipe as instructed. Weigh the finished recipe, then divide the weight of the finished recipe (not including the weight of the container the food is in) by the desired number of servings. Result will be the weight of one serving.
Did you make this recipe?
Please consider Pinning it!!

Leave a Reply