
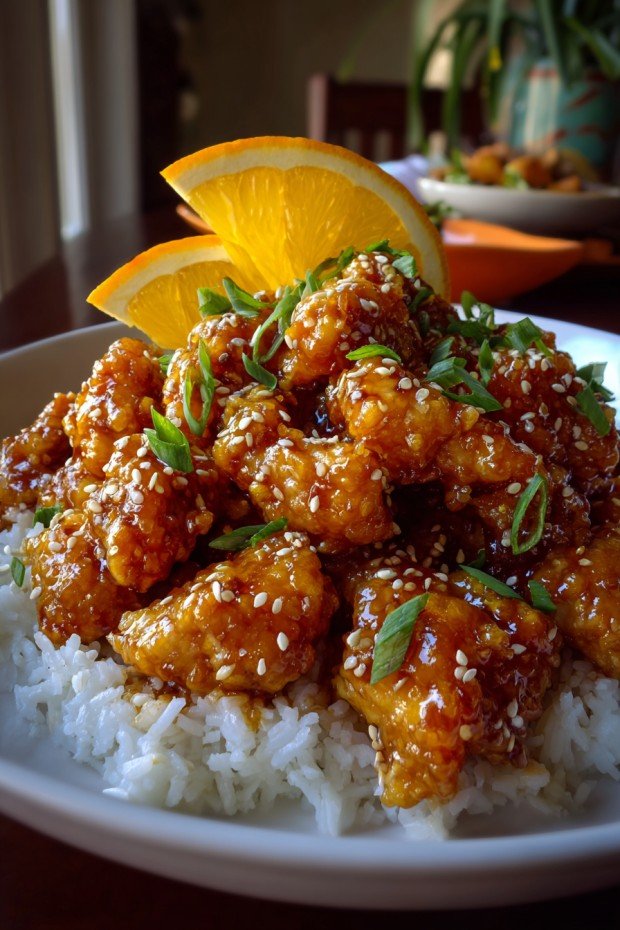
Hey y'all! If you're craving that crave-worthy sweet-and-tangy orange chicken but eating gluten-free, this recipe is about to jump to the top of your dinner list! With crispy chicken pieces coated in a sticky, citrus-infused sauce, this dish is perfect for busy weeknights, family dinners, or even impressing friends at a casual get-together. Let's get cooking!
Why You'll Love This
- Totally gluten-free—perfect for celiac or gluten-sensitive eaters without sacrificing flavor.
- Achieves restaurant-style crispiness using simple pantry ingredients.
- Ready in just 35 minutes, making weeknight meals super convenient!
- Packed with bright orange flavor and a touch of zesty heat.
- Healthier than takeout—fresh ingredients, no MSG, and low in processed additives.
Ingredients
- 1 ½ lbs boneless, skinless chicken breast, cut into 1-inch cubes
- ½ cup cornstarch (ensure gluten-free)
- 2 large eggs
- ½ teaspoon salt
- ½ teaspoon black pepper
- 3 tablespoon avocado oil or neutral oil (for frying)
- For the orange sauce:
- ½ cup fresh orange juice (about 2 oranges)
- 2 tablespoon orange zest
- ¼ cup gluten-free tamari or coconut aminos
- ¼ cup honey
- 3 tablespoon rice vinegar
- 2 tablespoon brown sugar
- 1 tablespoon minced garlic (about 3 cloves)
- 2 teaspoon grated fresh ginger
- 1 tablespoon cornstarch + 2 tablespoon water (for slurry)
- Crushed red pepper flakes, to taste (optional)
- Sliced green onions & sesame seeds, for garnish
Directions
1. Prep the Chicken
- In a medium bowl, whisk eggs with salt and black pepper.
- Place cornstarch in a separate shallow bowl.
- Dip each chicken piece in the egg mixture, then dredge in cornstarch until fully coated. Set aside on a plate.
2. Cook the Chicken
- Heat avocado oil in a large nonstick skillet over medium-high heat.
- Add the chicken in a single layer (cook in batches if needed). Cook 4-5 minutes per side, turning as needed, until golden, crispy, and cooked through. Remove to a clean plate.
3. Make the Orange Sauce
- In a bowl, whisk together orange juice, orange zest, tamari, honey, rice vinegar, brown sugar, garlic, and ginger.
- Pour into a small saucepan over medium heat. Bring to a simmer, stirring occasionally.
- Mix cornstarch and water to make a slurry, then slowly whisk into the simmering sauce.
- Simmer 2-3 minutes, until thickened to a glossy, syrupy consistency. Stir in red pepper flakes if using.
4. Bring It All Together
- Add crispy chicken to the skillet and pour the orange sauce over the top.
- Toss to coat every piece thoroughly. Heat another 1-2 minutes until everything is sticky and delicious.
- Serve hot, garnished with sliced green onions and sesame seeds.
Notes
- Pat chicken dry before coating for the crispiest crust.
- Oil temperature should be hot but not smoking; test with a small piece first for sizzling.
- If you like extra heat, add a pinch more red pepper flakes to the sauce!
Variations
- Orange Cauliflower: Swap chicken with bite-sized cauliflower florets for a vegetarian version.
- Spicy Orange Chicken: Add 1-2 teaspoons of Sriracha to the sauce for a fiery kick.
- Orange Shrimp: Substitute shrimp for chicken and reduce cooking time by 2-3 minutes.
Required Equipment
- Large nonstick skillet or wok
- Mixing bowls (medium and small)
- Whisk
- Spatula or tongs
- Microplane or fine grater (for zest and ginger)
Storage Instructions
- Store leftover orange chicken in an airtight container in the refrigerator for up to 3 days.
- Reheat in a skillet over medium heat or in the microwave until hot. For best texture, avoid freezing.
Suggested Pairings & Serving Recommendations
- Serve over fluffy steamed white or jasmine rice.
- Pair with sautéed broccoli or snap peas for added crunch and color.
- Top with extra orange zest and fresh lime wedges for a citrusy kick.
Pro Tips
- Cut chicken into uniform pieces for even cooking and perfect bites.
- Don’t overcrowd the pan—work in batches to keep chicken extra crispy.
- Double the sauce and reserve half for dipping or drizzling on veggies!
Frequently Asked Questions
- Can I make this dairy-free too?
- Absolutely! This recipe is naturally dairy-free as written.
- What’s the best substitute for tamari?
- If you can’t find tamari, coconut aminos or a certified gluten-free soy sauce work great.
- How can I make this ahead?
- Prep the chicken and the sauce separately up to 2 days ahead. Crisp chicken just before serving, then toss with heated sauce.
Prep time: 15 minutes
Cook time: 20 minutes
Total time: 35 minutes
Ingredients
- 1 lb boneless, skinless chicken breast, cut into bite-size pieces
- ½ cup gluten-free all-purpose flour
- ½ cup cornstarch
- 2 large eggs, beaten
- 2 tablespoon vegetable oil, for frying
- ½ cup orange juice (freshly squeezed recommended)
- 2 tablespoon gluten-free soy sauce
- ¼ cup sugar
- 2 tablespoon rice vinegar
- 1 tablespoon orange zest
- 2 cloves garlic, minced
- 1 teaspoon grated fresh ginger
- ½ teaspoon crushed red pepper flakes (optional)
- 2 teaspoon cornstarch mixed with 2 tablespoon water
Instructions
-
1In a medium bowl, combine the gluten-free flour and cornstarch. In a separate bowl, beat the eggs.
-
2Dip the chicken pieces in the egg, then dredge them in the flour mixture until well coated.
-
3Heat the vegetable oil in a large skillet over medium-high heat. Add the chicken pieces in batches and cook until golden and crispy, about 6 minutes per batch. Remove and set aside.
-
4In a separate pan, combine orange juice, sugar, soy sauce, rice vinegar, orange zest, garlic, ginger, and red pepper flakes. Bring to a simmer over medium heat.
-
5Stir in the cornstarch-water mixture and cook until the sauce thickens, about 2 minutes.
-
6Add the cooked chicken to the sauce, tossing to coat evenly. Serve hot, garnished with green onions or sesame seeds if desired.
Approximate Information for One Serving
Nutrition Disclaimers
Number of total servings shown is approximate. Actual number of servings will depend on your preferred portion sizes.
Nutritional values shown are general guidelines and reflect information for 1 serving using the ingredients listed, not including any optional ingredients. Actual macros may vary slightly depending on specific brands and types of ingredients used.
To determine the weight of one serving, prepare the recipe as instructed. Weigh the finished recipe, then divide the weight of the finished recipe (not including the weight of the container the food is in) by the desired number of servings. Result will be the weight of one serving.
Did you make this recipe?
Please consider Pinning it!!


Leave a Reply